Magento
Use the instructions below to enable Splitit installments on your Magento site, including messaging that will introduce your customers to installment payment options early on in their shopping journey.
How It Works
The Splitit payment method will show up on your storefront according to the enable/disable setting in your Magento admin (note that if the product amount is out of the amounts range set by Splitit on your account, the Splitit payment method will not be shown).
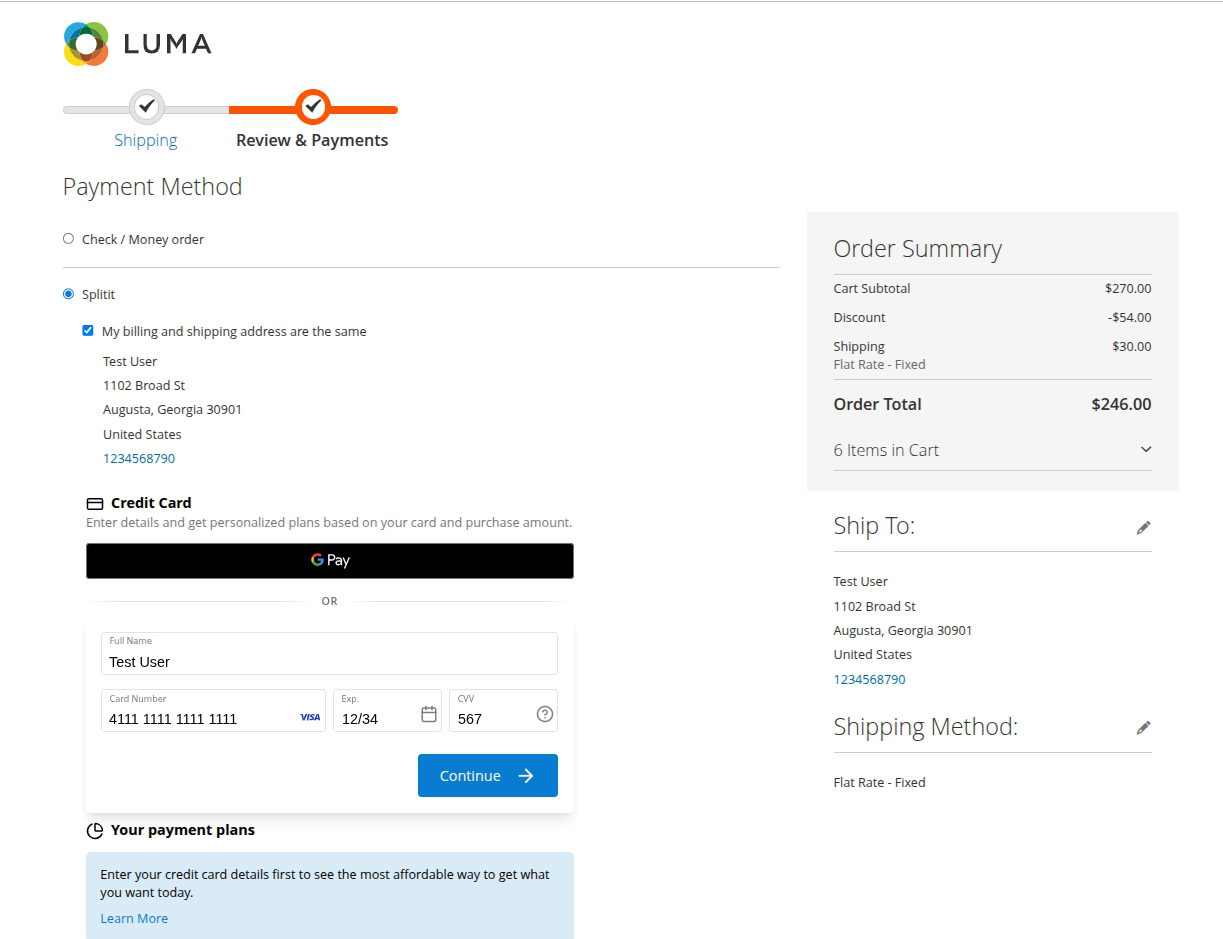
At checkout, shoppers can select the installment plan duration according to the settings in your Splitit account.
If 3D secure is not enabled in the admin configuration, and if the transaction is successful, the user will see a success page by clicking the “Place Order” button. The customer will see an error message if the transaction is unsuccessful.
If 3D secure is enabled in the admin configuration, the user will see a pop-up after clicking the ”Place Order” button.
Once 3D secure verification is successful, users will be redirected to the order success page.
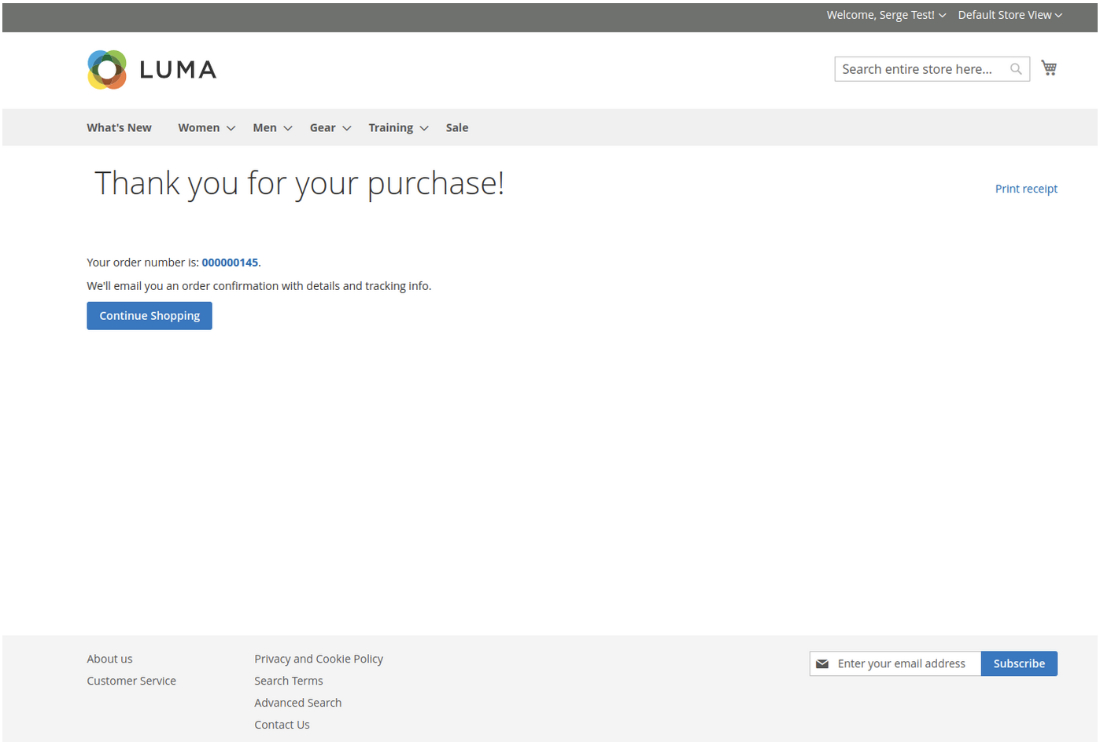
Conversely, the user will see an error on the payment page if the verification fails.
Installation (On Server)
-
Acquire the Splitit Magento extension from the Magento Marketplace.
-
Install the extension via the command line:
-
Open a terminal, navigate to the root directory of your Magento project, and run the following commands:
-
If you have a previous version of the SDK installed, remove it by running:
composer remove splitit/sdk
-
Once you have removed the old version, or if this is the first time you are installing the extension:
composer require splitit/module-payment-gateway
composer require splitit-dev/splitit-web-php-sdk
-
-
Set up the extension:
-
After installing the packages, run the following commands to set up the extension:
php bin/magento setup:upgrade
php bin/magento setup:di:compile
php bin/magento setup:static-content:deploy
php bin/magento cache:clean
-
-
Verify the installation by check the Magento admin panel to ensure the module is installed and functioning correctly.
Configuration (Using Magento Admin)
Select Store Scope (if applicable)
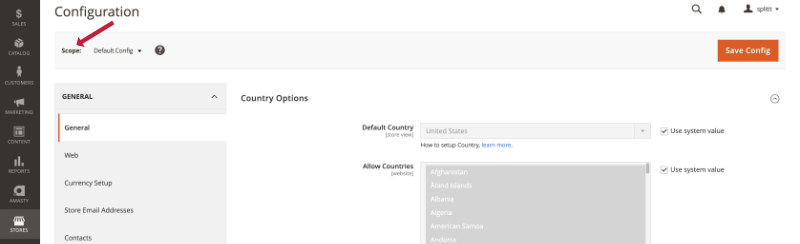
If you have multiple Magento stores, before starting configuration, make sure you have the correct Scope selected at upper left in the admin under Stores -> Configuration.
Setup the Splitit Plugin
-
In the admin, go to Stores -> Configuration -> Sales -> Payment Methods, then scroll down to see Splitit under Other Payment Methods.
-
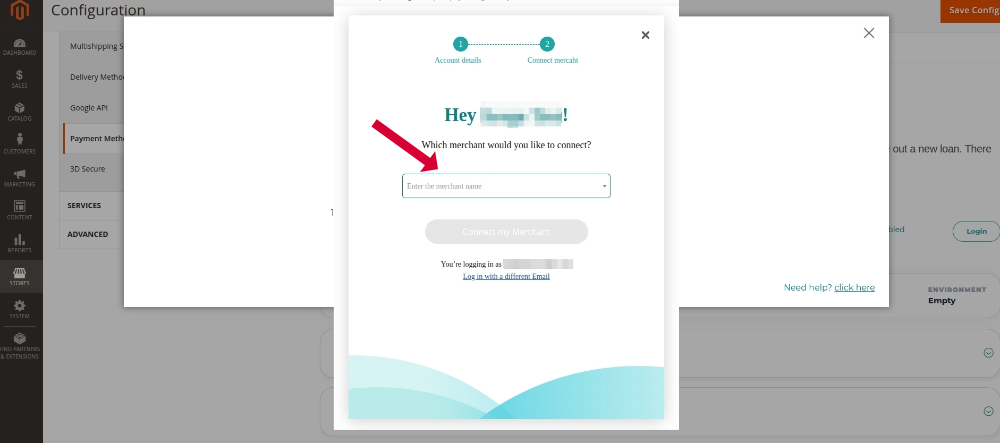
Select Splitit and choose the account you’d like to use. A demo account should be used for demo, development and testing purposes, while a live account should be used to run your store:
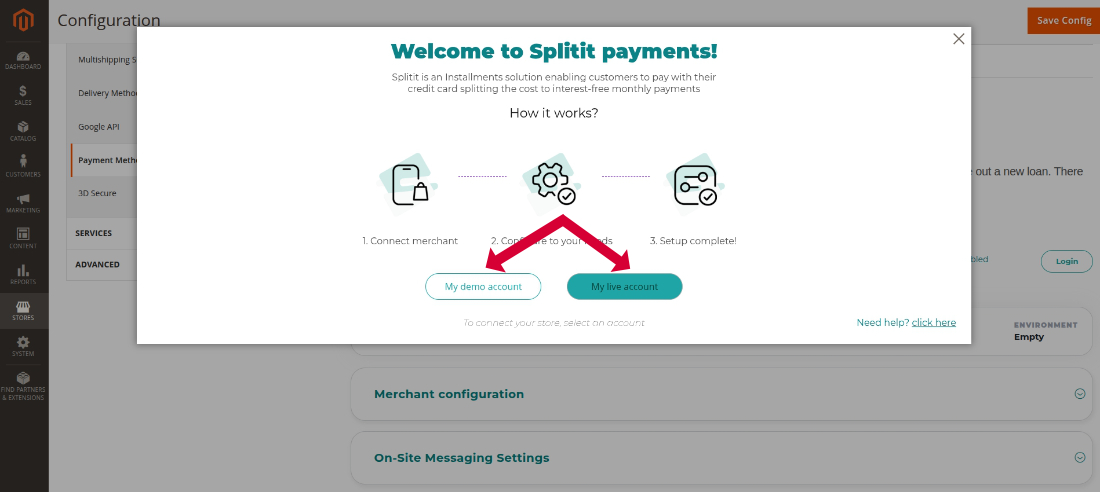
- Next follow the steps to log in, picking your merchant and terminal accounts.
Enable Splitit Plugin and Add Your Splitit Account
Now that the module has been installed successfully, the next step is to enable it and login into your Splitit account.
-
Go to Stores -> Configuration -> Sales -> Payment Methods then scroll down to select Splitit under Other Payment Methods.
-
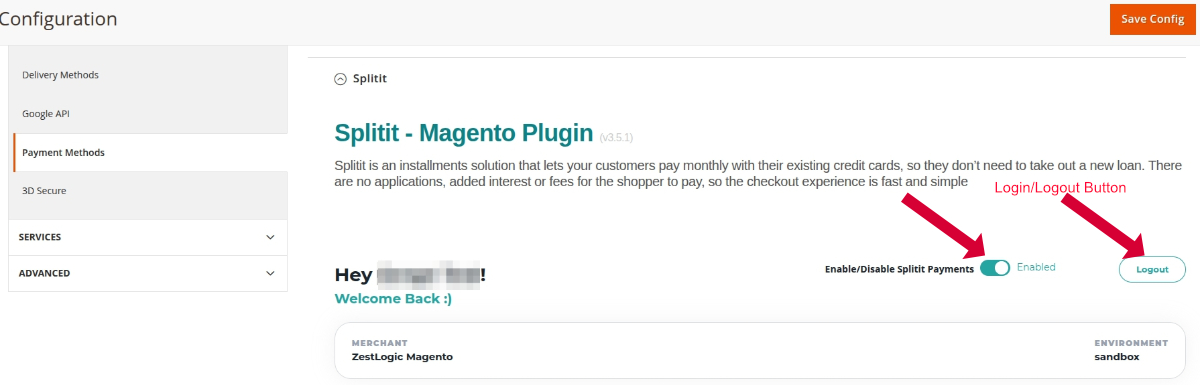
Turn on the switch for Enable/Disable Splitit Payments. This will allow Splitit to show up at checkout (subject to its order amount range).
-
Next, click the Login button to connect to your Splitit account. If you connect to a Splitit sandbox account (for testing purposes), Environment will show as sandbox (note that you should connect to a Splitit sandbox account if you are using the plugin in demo mode). If you connect to a Splitit production account, environment will show as production. Additionally, your merchant name will show up under Merchant.
-
Select Save Config in the top-right-hand corner of your screen.
Configure Your Merchant Settings
In the Splitit plugin section of the Magento admin (Stores -> Configuration -> Sales -> Payment Methods -> Scroll Down to Splitit plugin), click on the Merchant configuration dropdown to access your main settings area. Each setting is defined below.
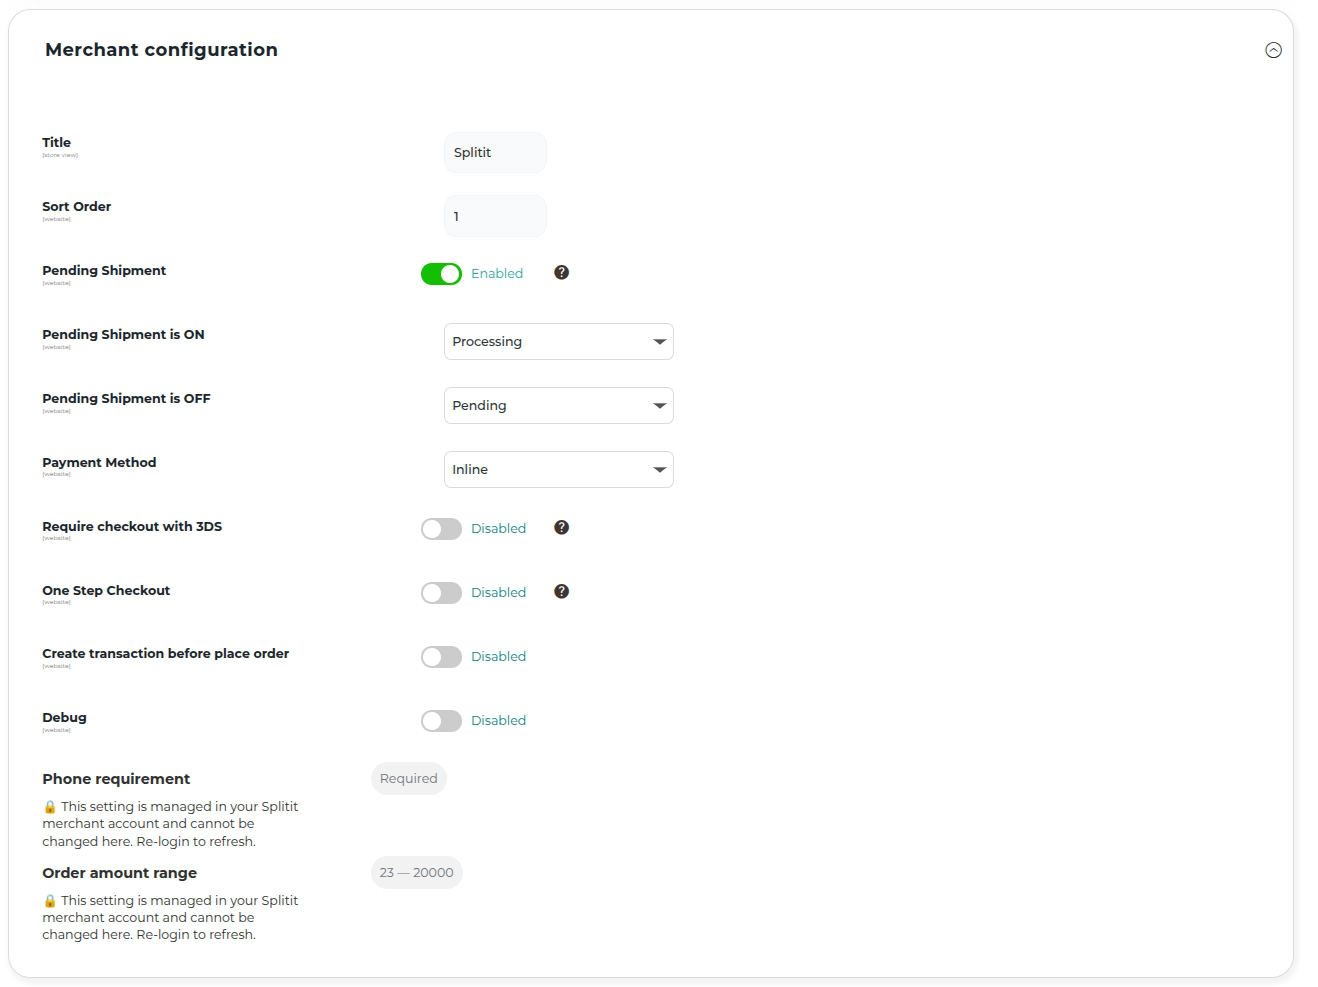
Title - The name shown to shoppers for the payment method at checkout (default: Splitit).
Sort Order - The position of Splitit relative to other payment methods at checkout.
Pending Shipment - This option applies to transaction handling. When enabled, transaction are only authorized at checkout and captured later (e.g., when you ship). This is useful for stores that capture on fulfillment. When disabled, funds are captured immediately.
Pending Shipment is ON - The Magento order status to apply while Pending Shipment is on (choose from Pending, Processing, Suspected Fraud)
Pending Shipment is OFF - The Magento order status to apply when Pending Shipment is off (same choices as above).
Payment Method - How the Splitit card form is presented at checkout: Inline means that card fields and plans are embedded directly in the Magento checkout; Redirect means that the shopper is sent to a Splitit-hosted page to complete payment.
Require checkout with 3DS - When enabled, shoppers must pass a 3D Secure verification step after entering their card.
One Step Checkout - Enable this if you use a one-step/one-page checkout extension, in order that Splitit initializes correctly on that checkout.
Create transaction before place order - Controls the order in which the Splitit plan and the Magento order are created. Leave at the default unless advised otherwise by Splitit.
Debug - When enabled, the plugin logs its requests and responses to help troubleshoot integration issues. Turn it off in production once everything is working.
Settings Managed in Your Splitit Account
The two settings at the bottom are readable here but are managed by Splitit. If they are changed by your Splitit CSM, make sure to refresh to view the updated values.
Phone requirement - Whether a customer phone number is required (e.g., Required).
Order amount range - The minimum–maximum cart range for which Splitit is offered (e.g., "23 - 20000"). Splitit is hidden at checkout for carts outside of this range, on either end.
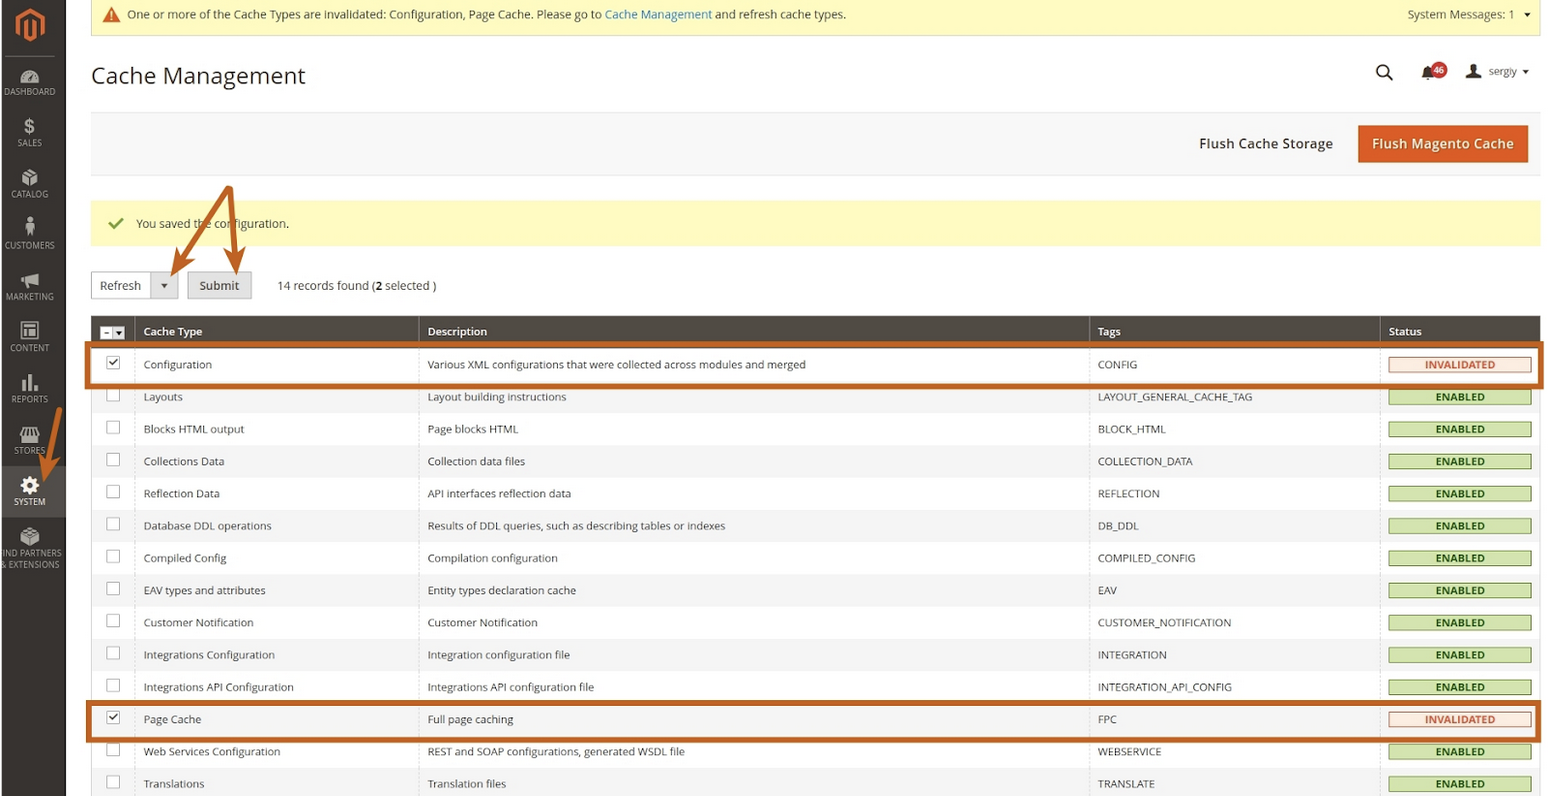
Please note that Splitit's settings are affected by Magento's cache. So after you change any of the available options and save your changes, you may also need to refresh Magento's cache. In order to do this, go to System > Cache Management, select the invalidated cache parameters, select Refresh and click Submit. Your changes will appear on your frontend once that is done.
Add On-Site Messaging to Your Store
On-Site Messaging lets you make your shoppers aware early on in their journey on your website that installment payments will be available at checkout. There are two types of On-Site Messages, Strips and One Liners, and they can be added to your Catalog Page, Product Page, Cart Page, Checkout Page and/or Home Page (Strips only). Each page type has its own settings for On-Site Messages, complete with a preview. Note that you can access the On-Site messaging configuration for Magento by going to Stores -> Configuration -> Sales -> Payment Methods -> Scroll Down to Splitit plugin -> On-Site Messaging Settings.
- As mentioned above, the Catalog, Product, Cart and Checkout pages offer both types of messages. On each of those pages a display component switch (ONE-LINER /STRIP) chooses which one is active for that page; you then fill in the settings for the type you selected.
- Before you add any of the On-Site elements below, make sure to set the global setting for number of payments at the top of the On-Site settings section:

Strips
Strips are full-width notification bars that stretch across the page (for example “Pay with installments. No application or fees.”). You can use them on all page types:
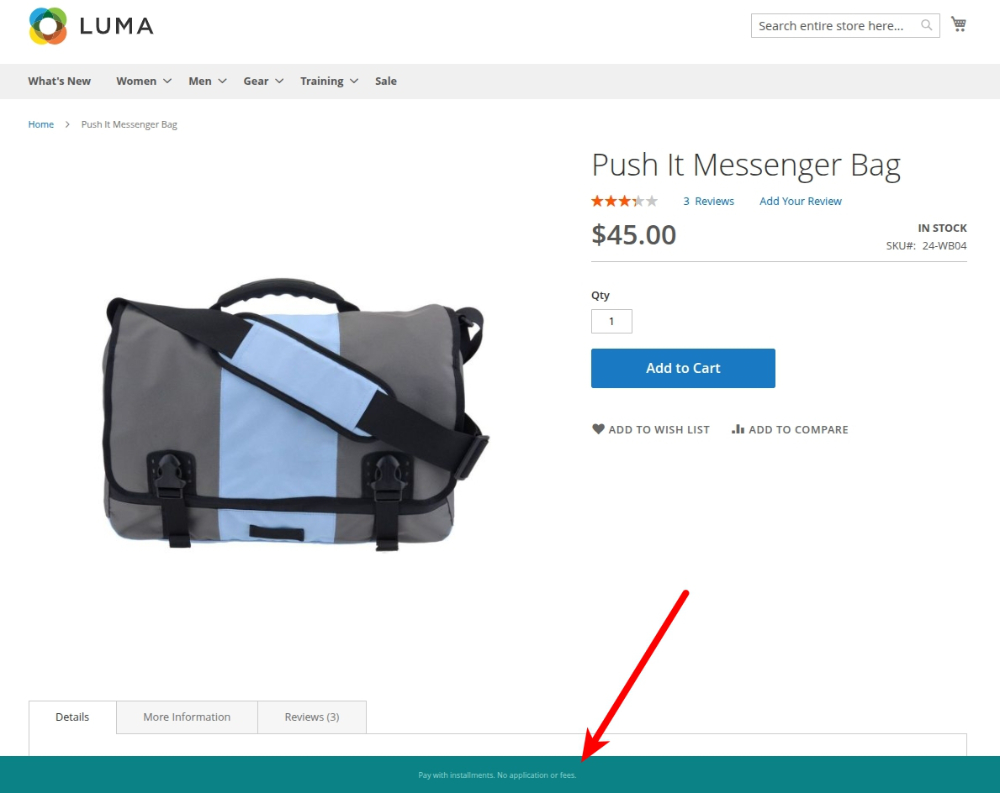
Strip Settings
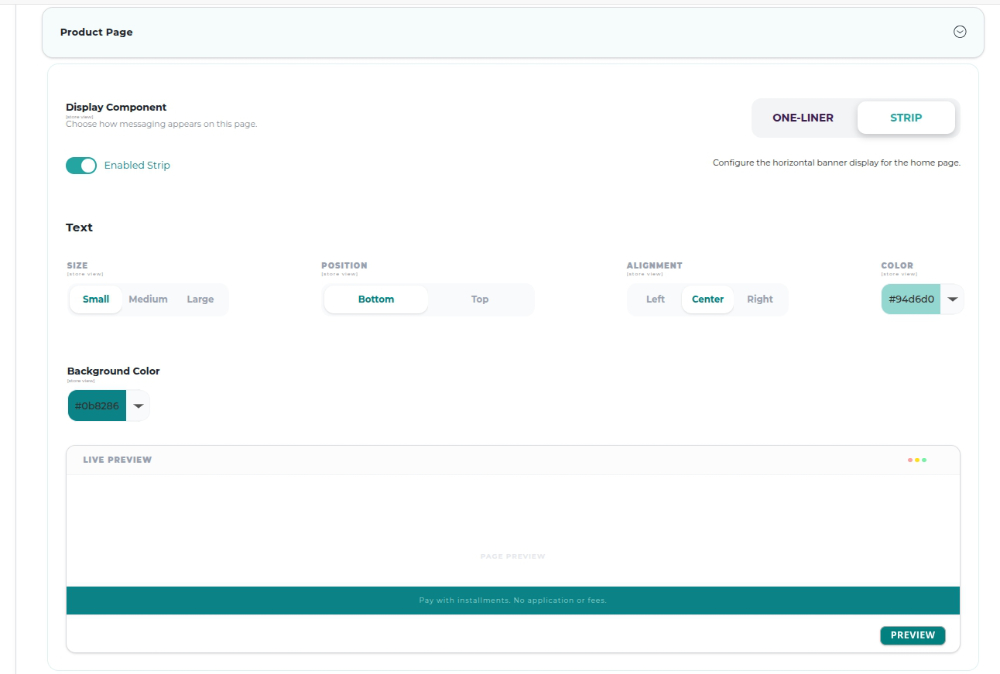
Enabled/Disabled Strip - Turns the Strip on or off for this page
Text - Size - Size of the Strip text. Options: Small/Medium/Large
Text - Position - Whether the Strip is docked at the top or bottom of the page. Options: Top/Bottom
Text - Alignment - Horizontal alignment of the Strip text. Options: Left/Center/Right
Text - Color - The Strip's text color. Options: choose color or set RGB or hex value
Background Color - The Strip's background color. Options: choose color or set RGB or hex value
- Be sure to preview your Strip in the preview box at the bottom.
- When you are finished changing your settings, click Save Config at upper right.
One Liners
One Liners are short installment texts placed next to a product price. You can use them on your Catalog, Product, Cart and Checkout pages (everywhere but Home):
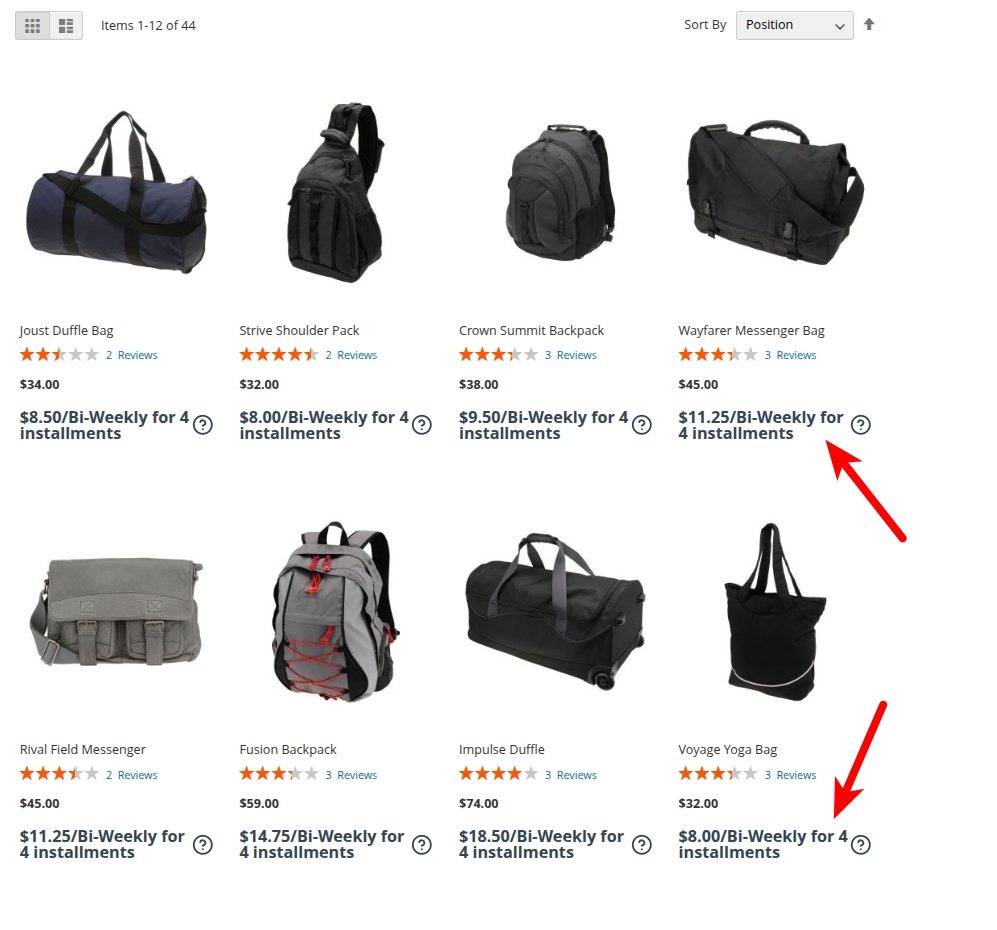
One Liner Settings
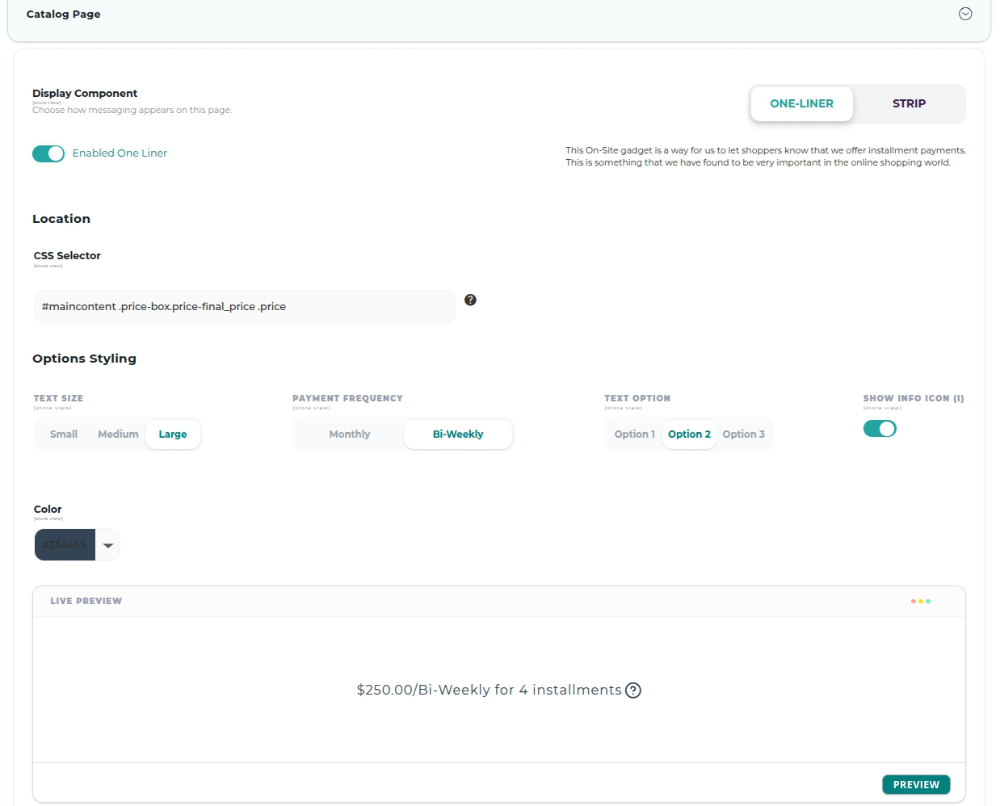
Enabled/Disabled One Liner - Turns the One Liner on or off for this page
Location-CSS Selector - Where the One Liner is injected, i.e., the CSS selector of the price container (e.g.,
#maincontent .price-box.price-final_price .price)
Text Size - Size of the One Liner text. Options: Small/Medium/Large
Payment Frequency - The installment cadence shown in the One Liner. Options: Monthly/Bi-Weekly
Text Option - Choose between alternative message wordings. Options: Option 1, Option 2, Option 3
Show Info Icon (i) - Show or hides the information ("?") icon.
Color - Set the text color of the One-Liner. Options: choose color or set RGB or hex value
- Be sure to preview your One Liner in the preview box.
- When you are finished changing your settings, click Save Config at upper right.
Please note that Splitit's settings are affected by Magento's cache. So after you change any of the available options and save your changes, you may also need to refresh Magento's cache. In order to do this, go to System > Cache Management, select the invalidated cache parameters, select Refresh and click Submit. Your changes will appear on your frontend once that is done.
Add Custom CSS for Branding
The custom CSS block allows you to customize the Splitit blocks on your storefront. You may need to use this area, for example, if you need to match your brand or in-house style. Access the custom CSS area for Magento by going to Stores -> Configuration -> Sales -> Payment Methods -> Scroll Down to Splitit plugin -> Custom CSS.
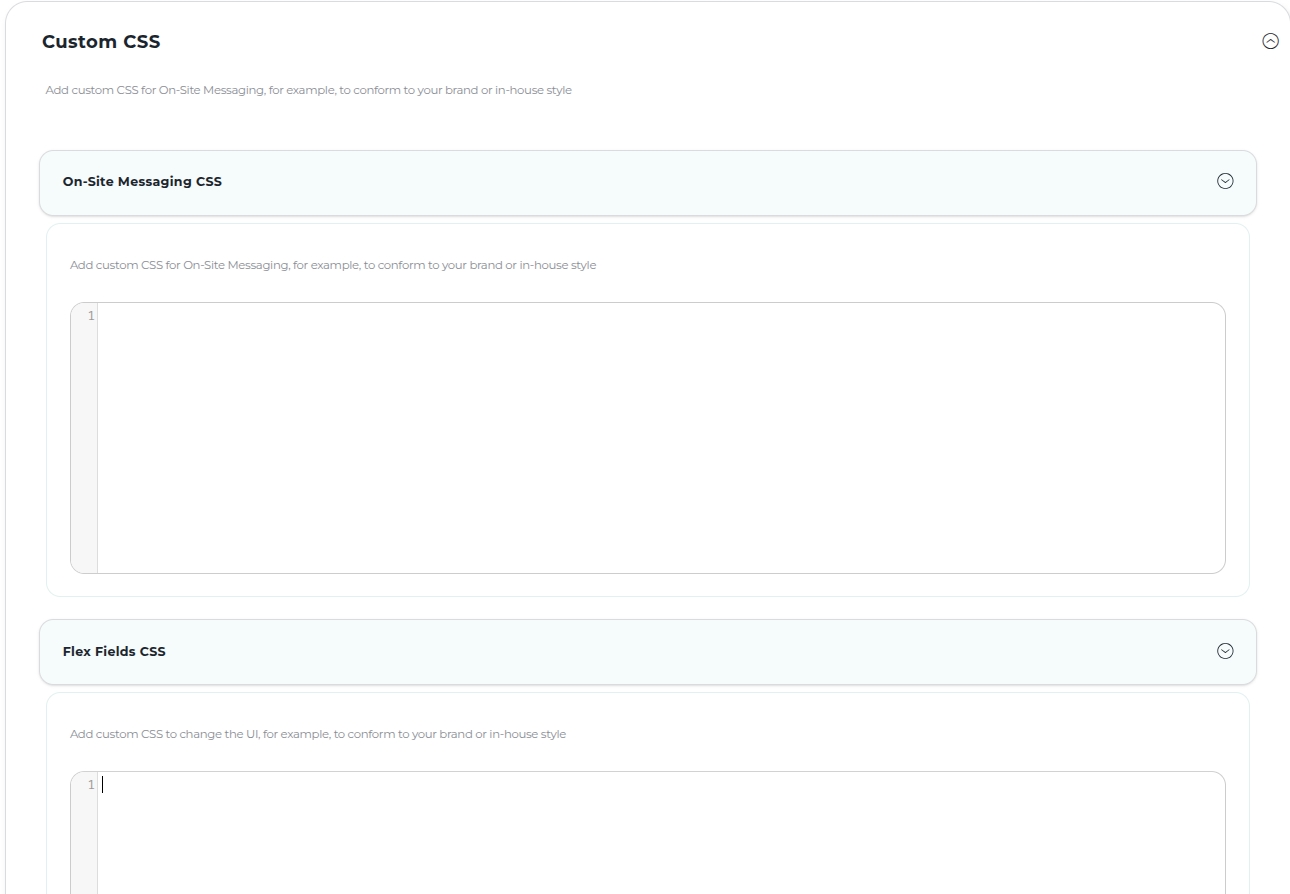
On-Site Messaging CSS - Styles added here are applied to your Strip/One-Liner widgets. For example, you might add top padding so a top strip does not overlap your header: .page-wrapper {padding-top: 54px;}
Flex Fields CSS - Custom styles added here are applied to the Splitit card fields that appear in the inline checkout form.
- When you are finished changing your settings, click Save Config at upper right.
Admin Utilities
Create Orders in Admin
You can create Splitit orders directly in your Magento admin.
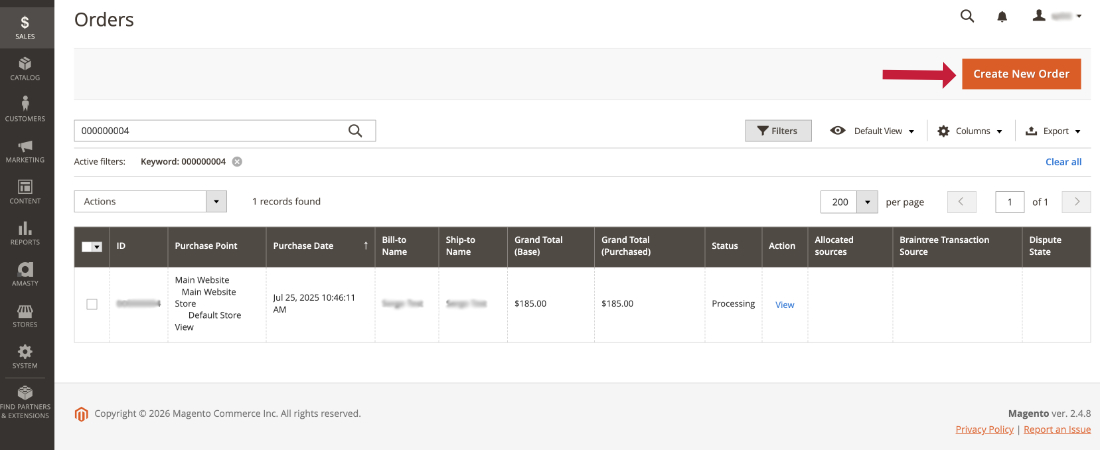
- Go to Sales -> Orders and click the Create New Order button at upper right.
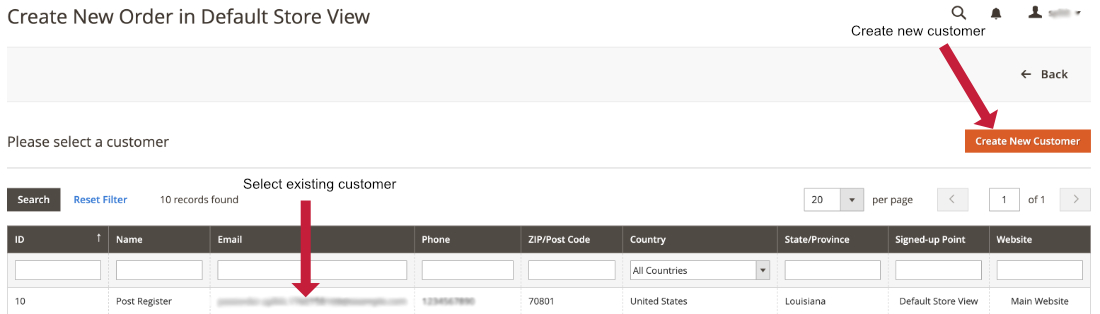
- Click Create New Customer or choose one of the existing customers from the list.
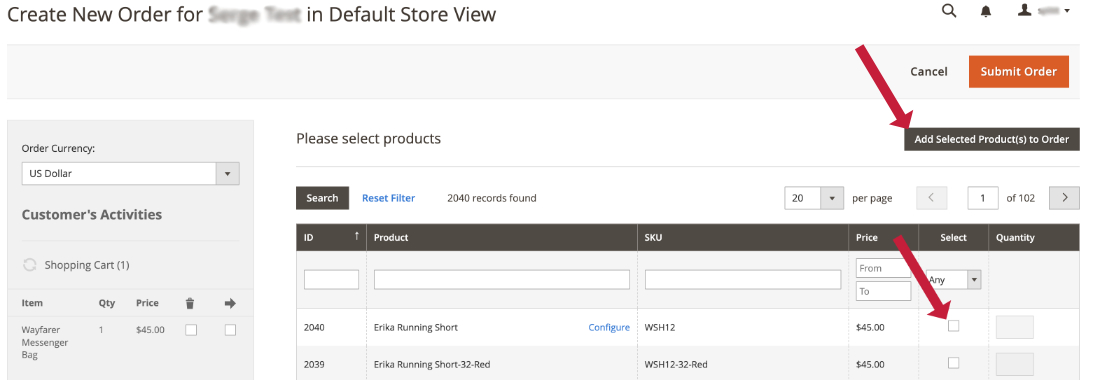
- To add items to purchase, begin by clicking the Add Products button.
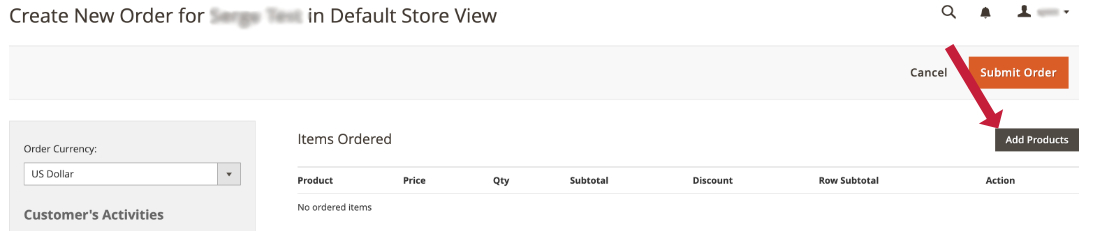
- Make selections in the resulting table and click Add Selected Product(s) to Order.
- Next, add the shopper's billing and/or shipping addresses.
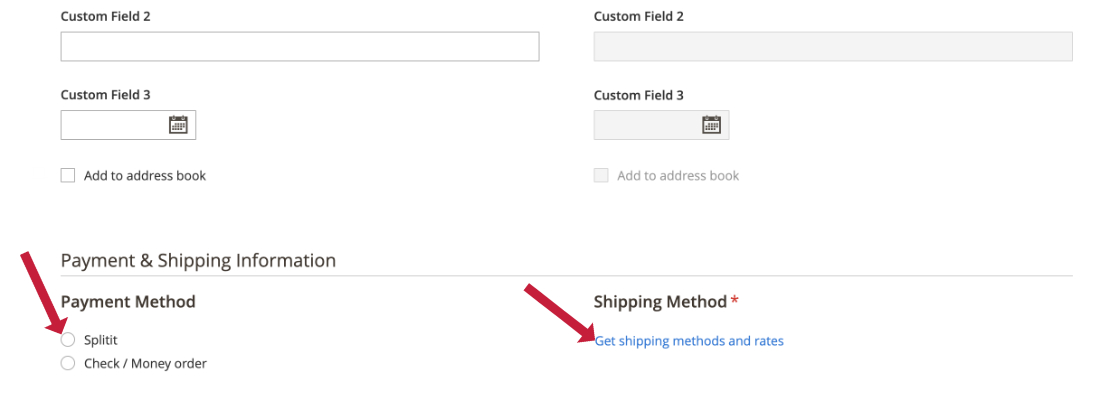
- Then select Splitit under "Payment Method" and click Get shipping methods and rates. Select a shipping method.
- The Splitit checkout form will appear under "Payment & Shipping Information".
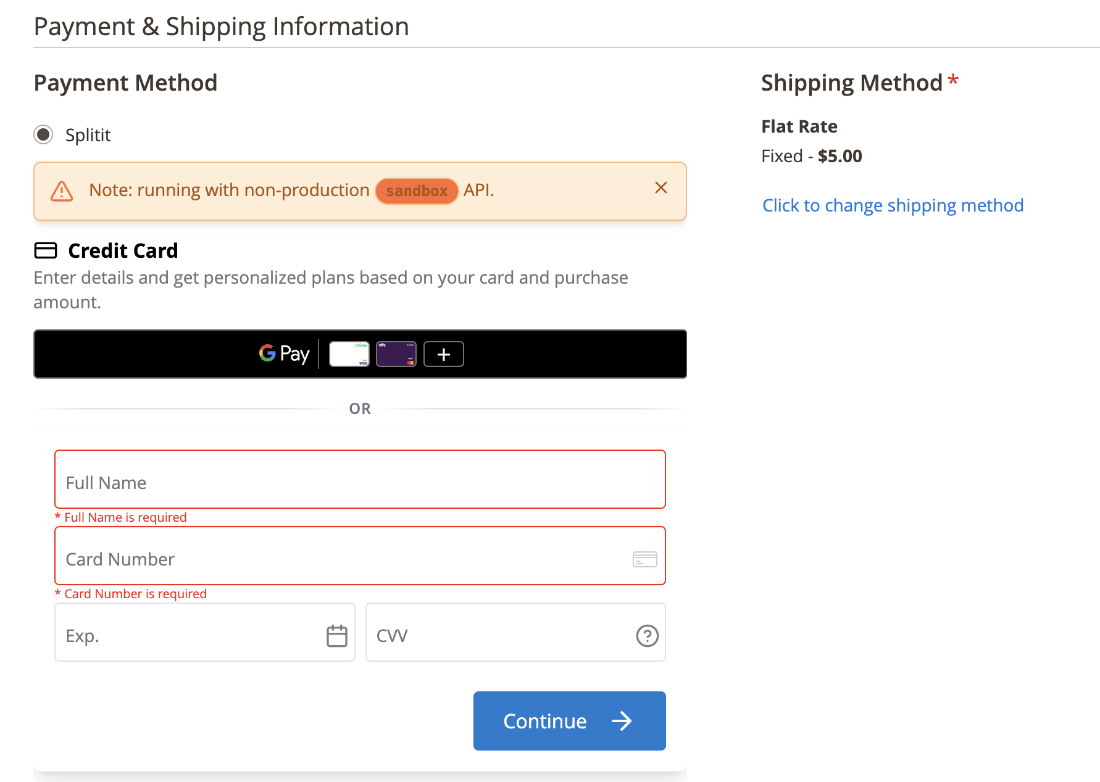
- Enter card information in the form then click Continue, in order to get available plans.
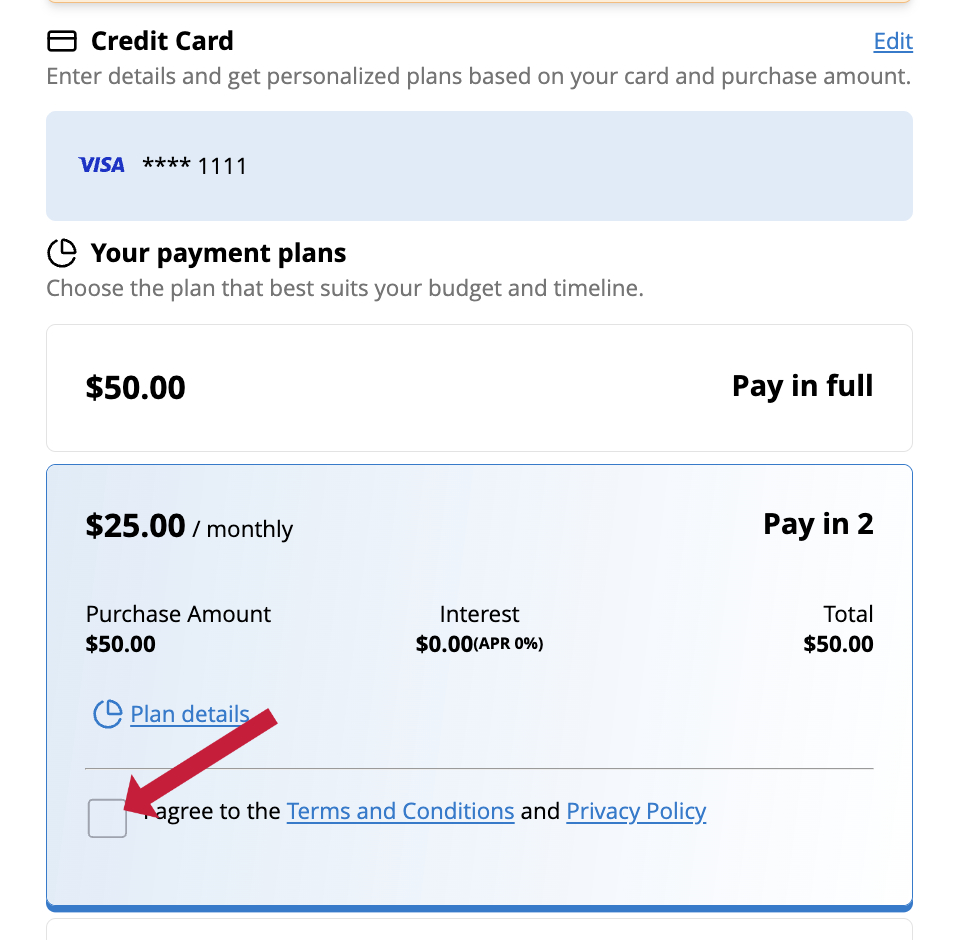
- Select a plan by clicking it, then agree to the "Terms and Conditions" and "Privacy Policy".
- Finally click Submit Order.
- Similar to storefront checkout, if 3D secure verification is enabled, verification will be performed when Submit Order is clicked. The user will see the 3D secure popup and the order will only be placed when verification succeeds.
- The Magento admin will alert you if the minimum order amount is not met for the Splitit payment method.
View Orders in Admin
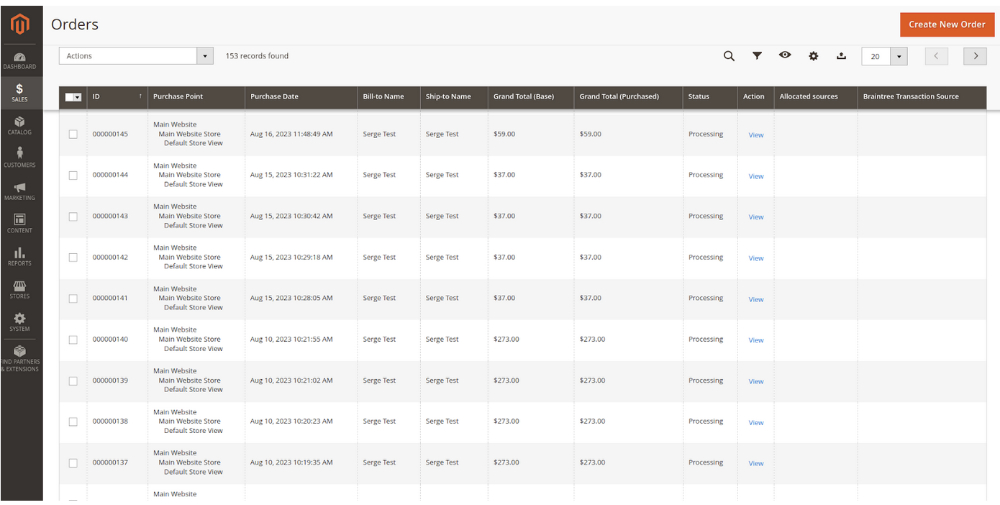
Order details can be viewed in the Magento admin under Sales -> Orders.
Cancel Orders in Admin
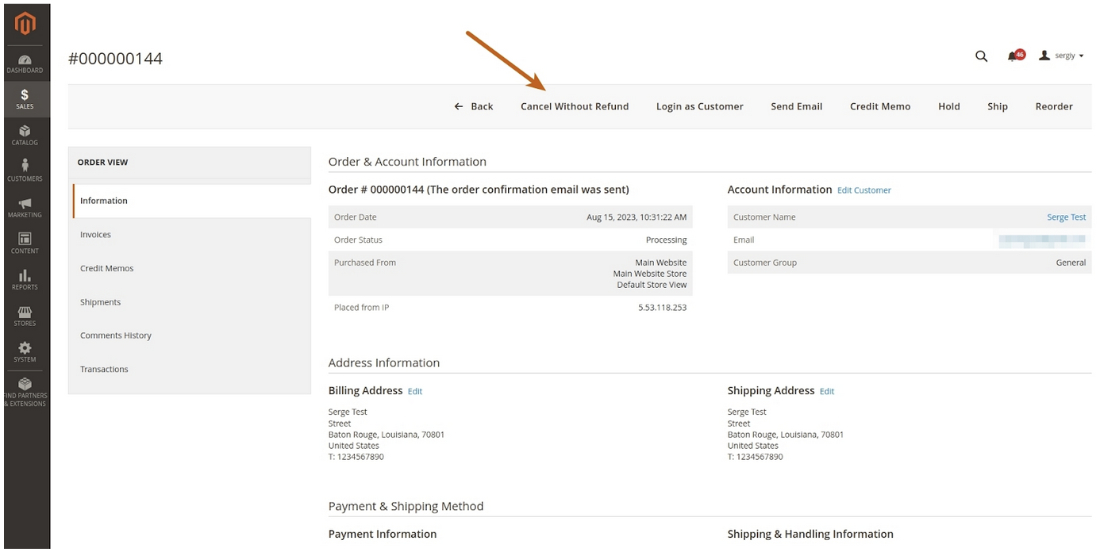
For orders paid with Splitit, the Cancel Without Refund button will appear in the Magento admin on that order's page. This button can be used to cancel the order without issuing any refund.
Refund Orders in Admin
Shoppers can request refunds for invoiced orders, and these refunds can be processed using the Magento admin. Full refunds return the total order amount to the shopper and close the order. Partial refunds refund the specified amount and keep the order open.
To request a refund:
- Go to Sales -> Orders and select the order you want to refund.
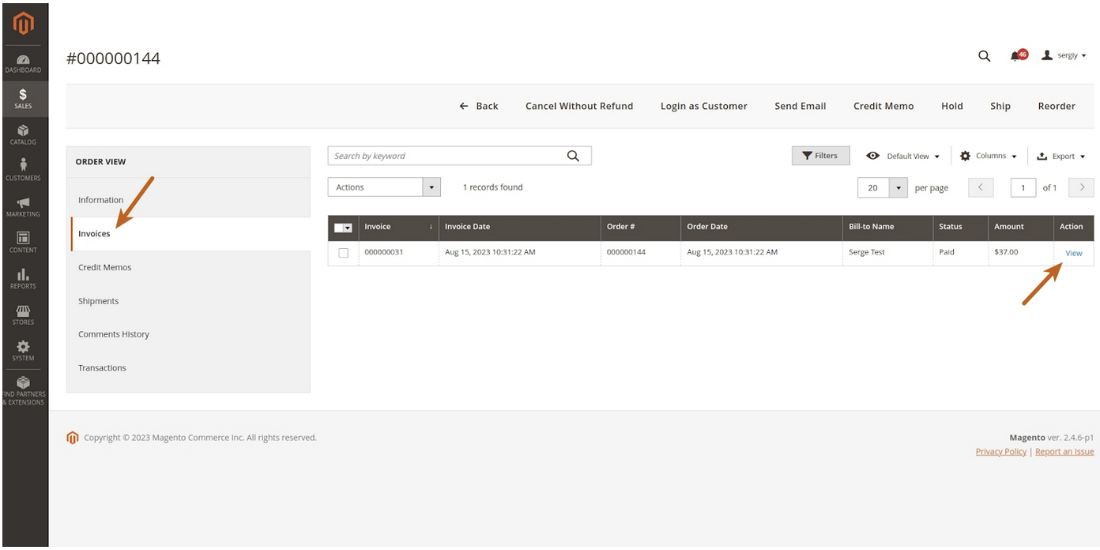
- In the order view, click on Invoices from the left navigation. (Alternatively, you can go to Sales -> Invoices.)
- Click View on the desired invoice.
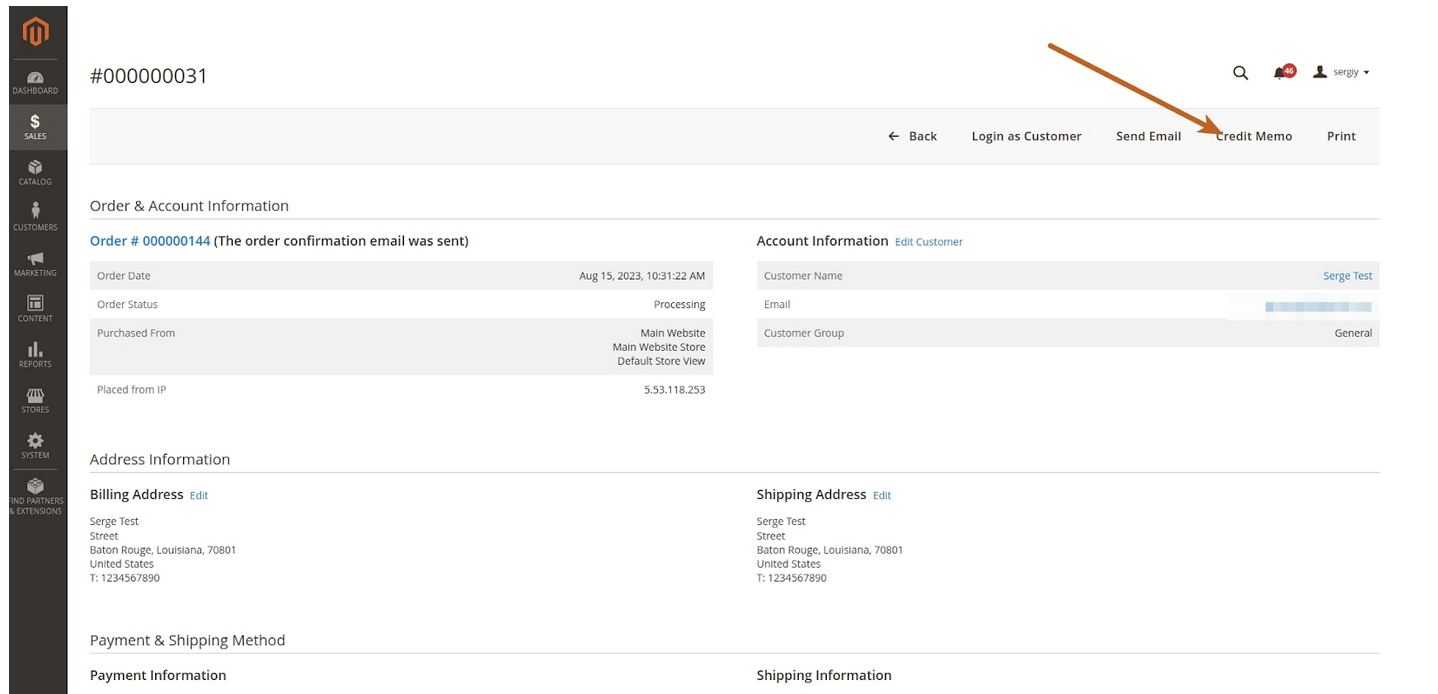
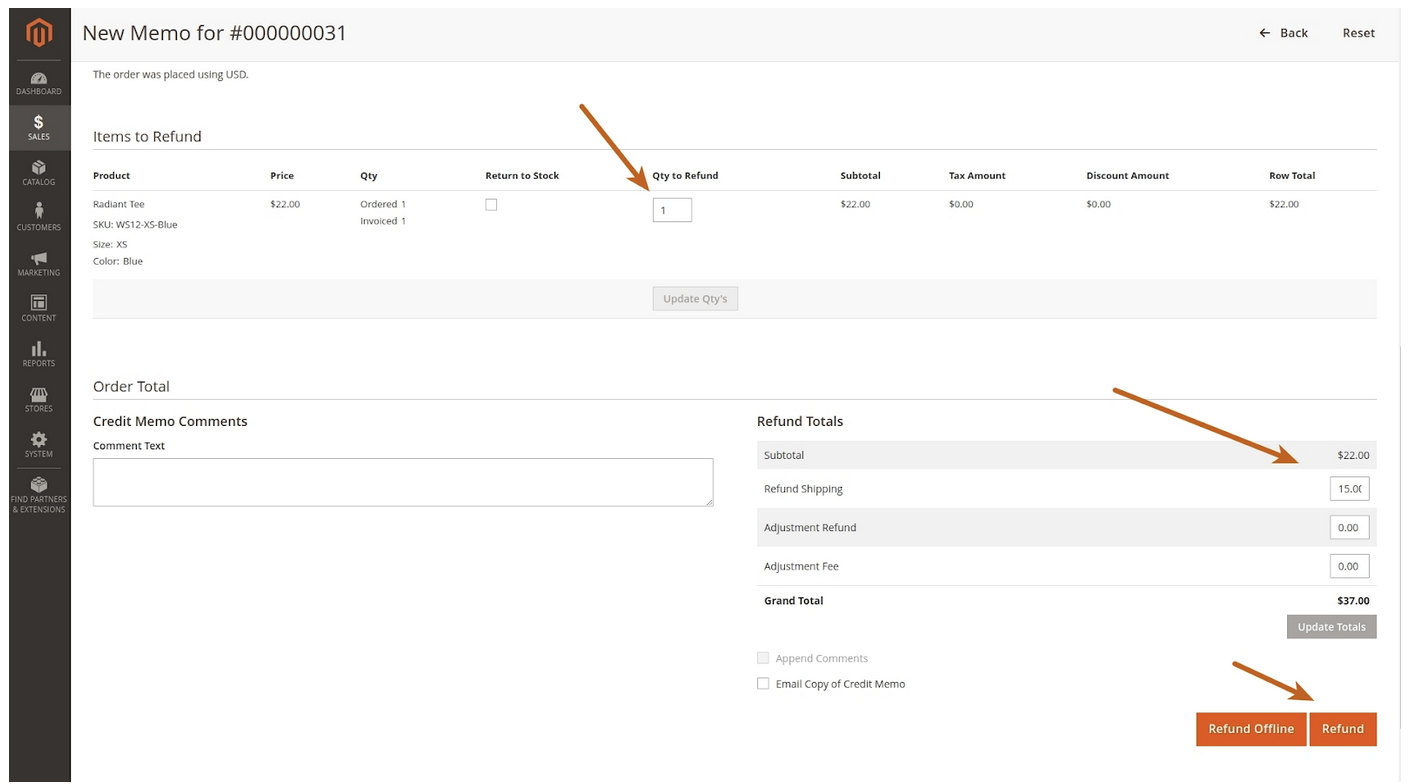
- Now click Credit Memo.
- On the Credit Memo page, specify the quantity of products to be refunded, and also define the refund amounts. Click on Refund.
Start Installments in Admin
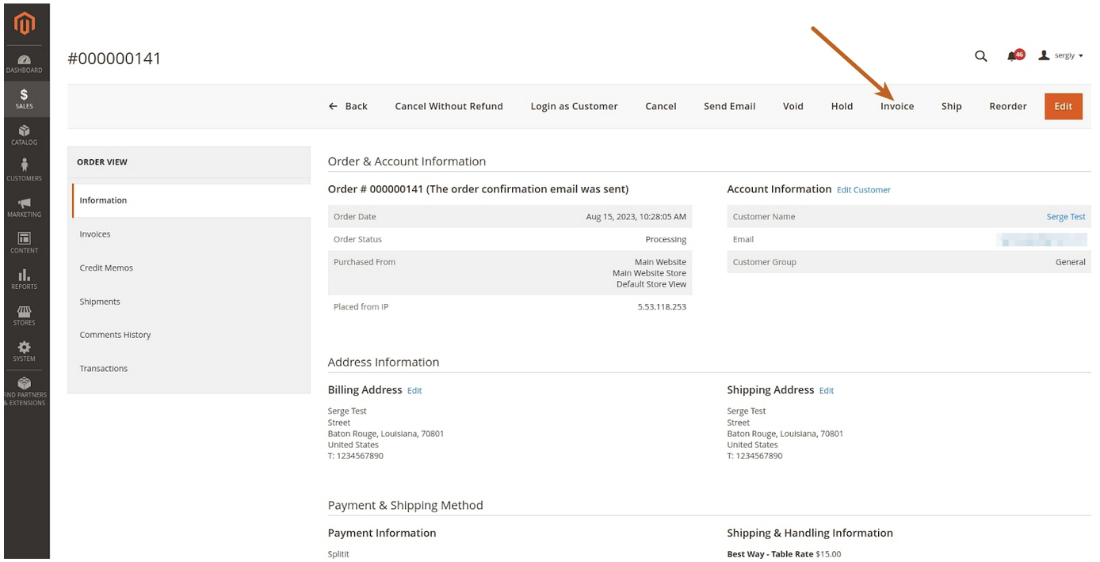
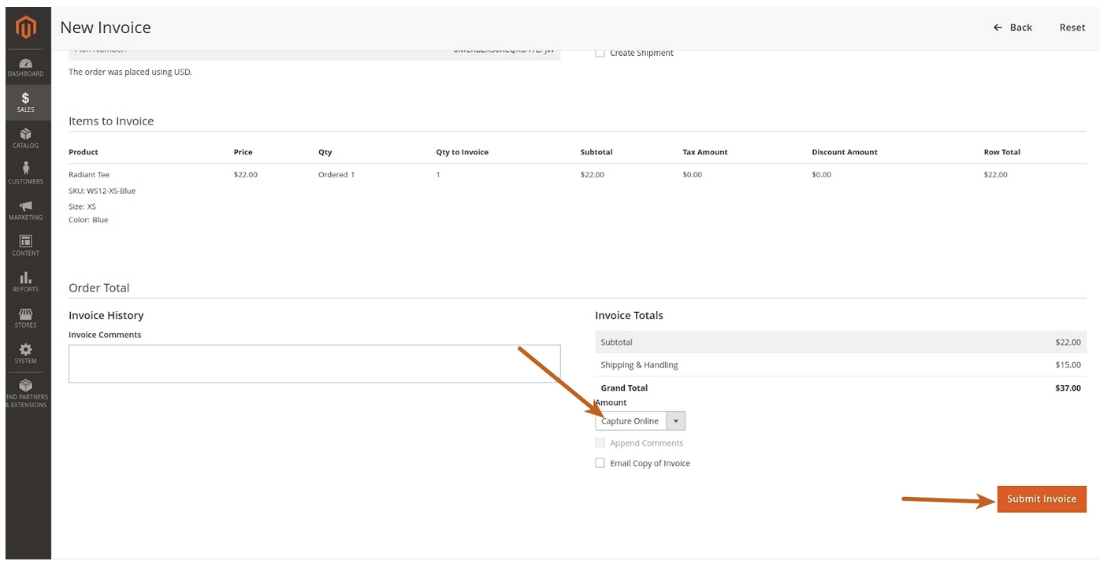
If Pending Shipment is enabled in the plugin's settings, the installments process won’t start immediately when a customer checks out. In order to start the installment plan and capture the first payment:
- Go to Sales -> Orders in the admin, then View the order in question. Once you're on the order's page, select Invoice at the top of the page.
- On the Invoice page, make sure that Capture Online is selected, and click Submit Invoice.
Uninstall
- Remove the module via the command line:
-
Open a terminal, navigate to the root directory of your Magento project, and run the following commands to uninstall the module:
composer remove splitit/module-payment-gateway
composer remove splitit-dev/splitit-php-sdk
- Update the Magento Configuration:
-
Run these commands to finalize the removal process and update the system:
php bin/magento setup:upgrade
php bin/magento setup:di:compile
php bin/magento setup:static-content:deploy
php bin/magento cache:clean
- Confirm the uninstallation:
- Verify that the module has been successfully removed from the Magento admin panel.