Shopline
Use the instructions below to enable the Splitit installments payment option in the payment and checkout experience on your Shopline store.
Installing the Plugin
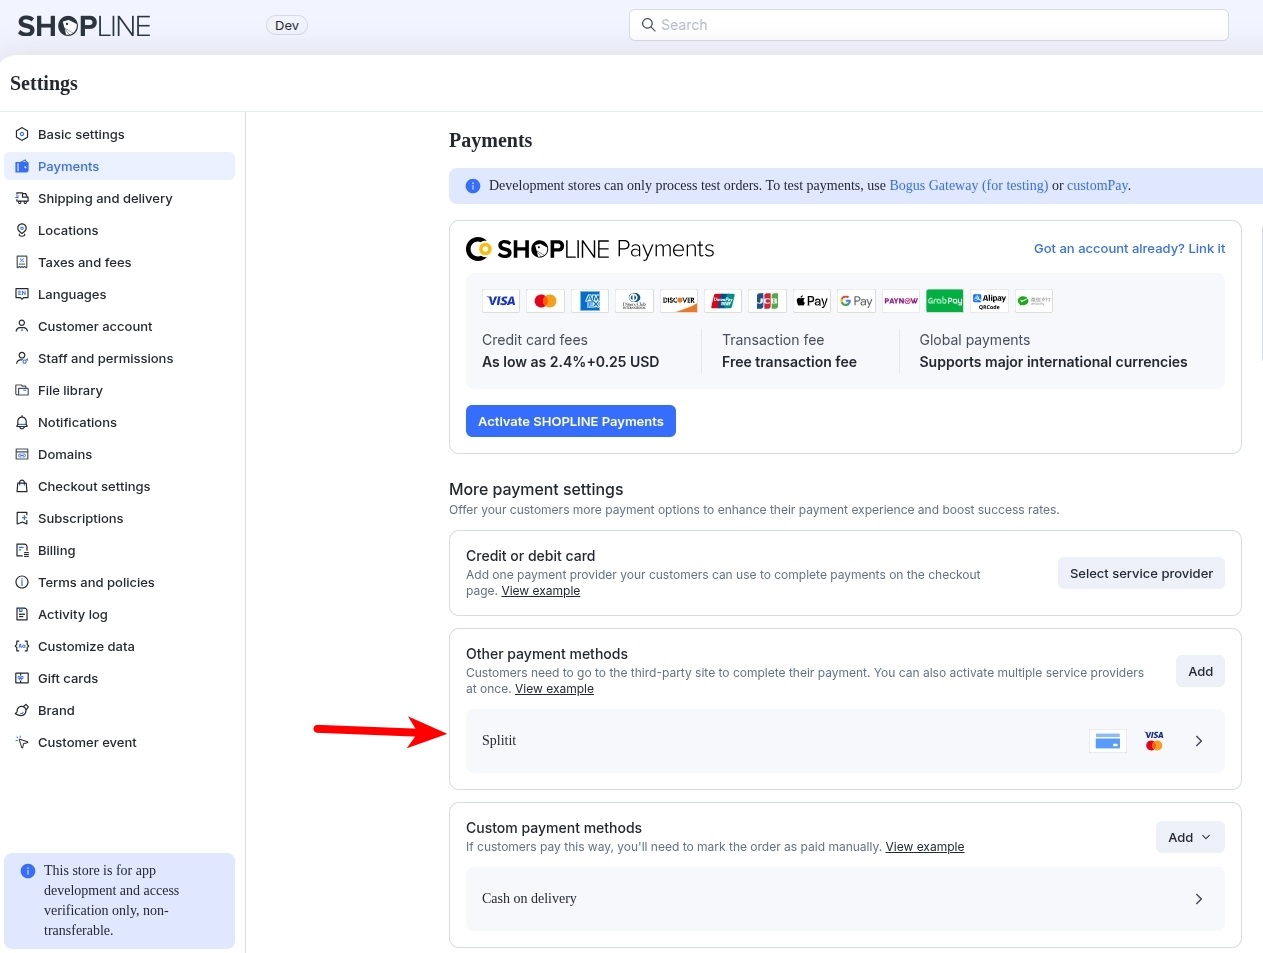
- In your Shopline admin panel, go to Settings -> Payments -> Other payment methods, select Splitit.
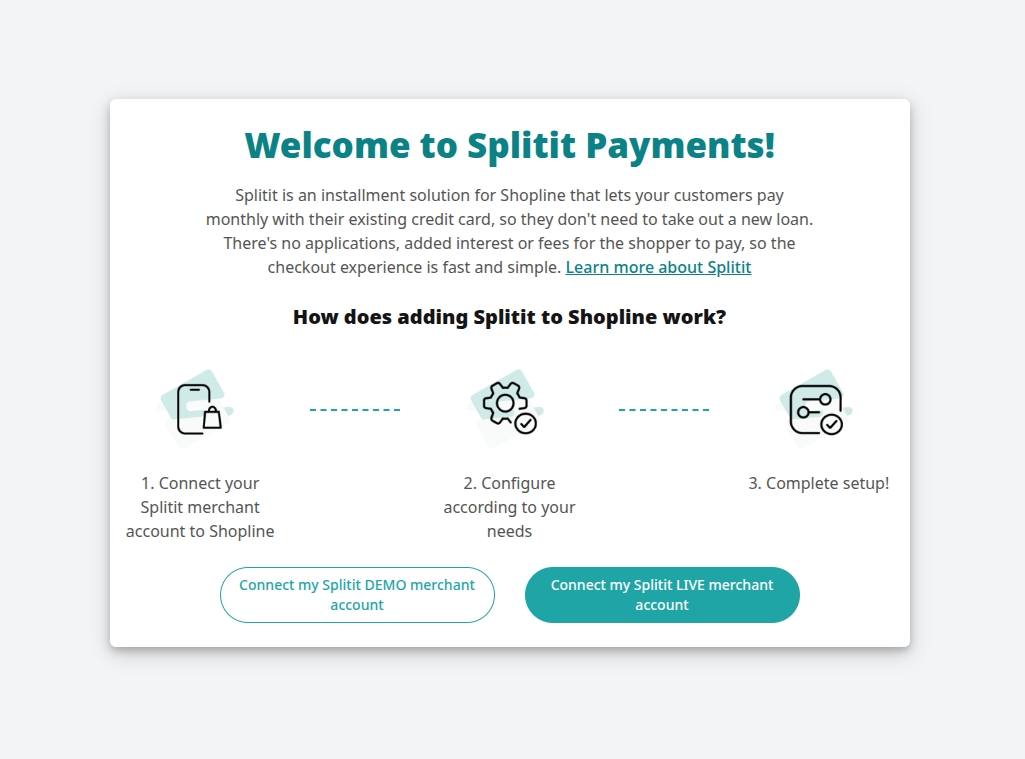
- Next, log into your Splitit account. For testing, choose Connect my Splitit DEMO merchant account, which will take you to your Splitit sandbox account login page; for real transactions, choose Connect my Splitit LIVE merchant account, which will connect you to Splitit's production account login page.
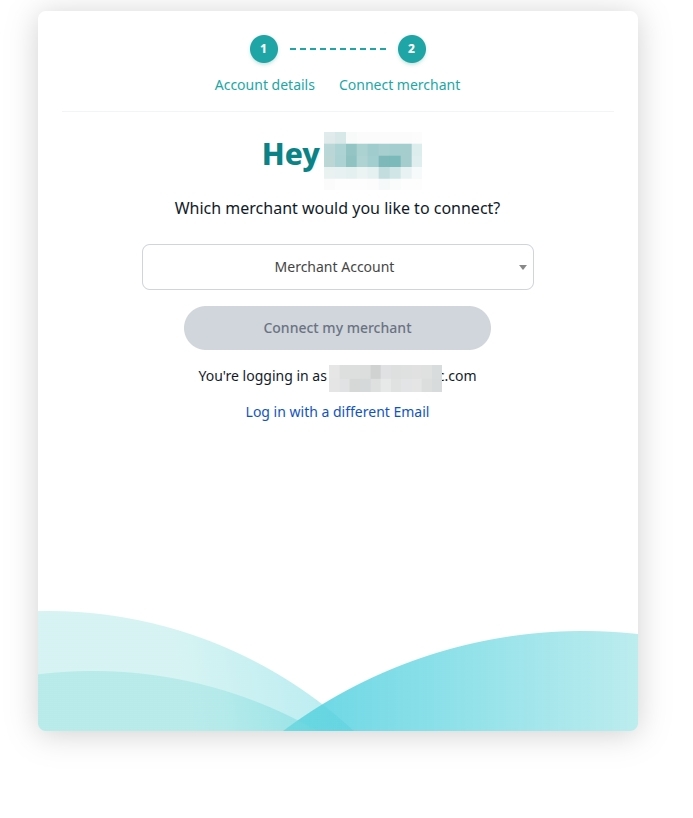
- After that, choose your Merchant Account, then your Terminal Account (they will be prepopulated; the Terminal Account will show up once you have filled in your Merchant account). Click Connect my merchant.
-
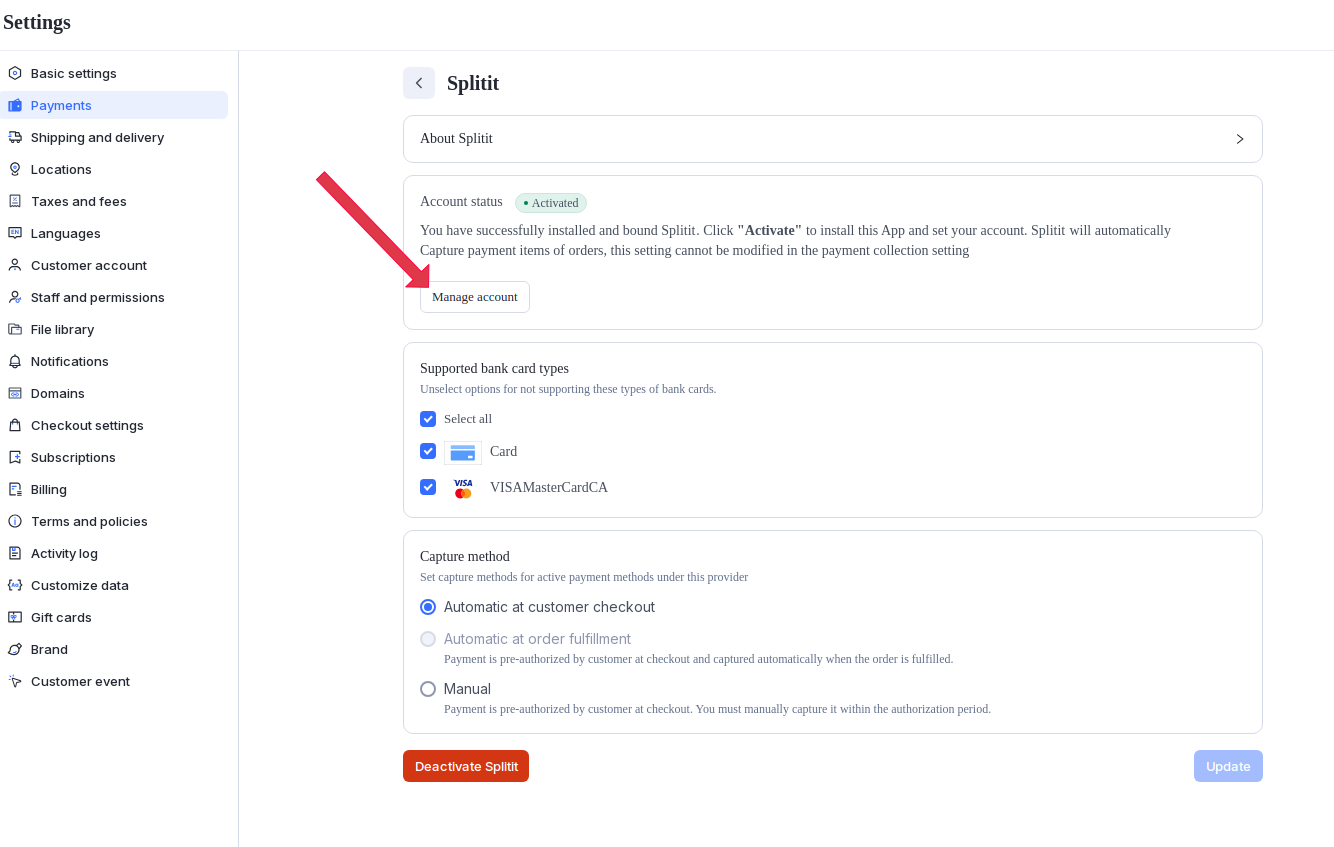
Once you have successfully logged in, you will still be at Settings → Payments → Splitit but you will see Activated status.
-
Look below and make sure Capture Method is set to Manual (the Splitit app manages authorization and capture automatically through the Pending Shipment option; leaving capture to Shopline risks the two mechanisms working against each other).
-
Now click Manage account to proceed to configure the plugin.
Configuring the Plugin
Configure plugin settings according to the image/descriptions below. Make sure to click Save Changes when you are finished changing settings.
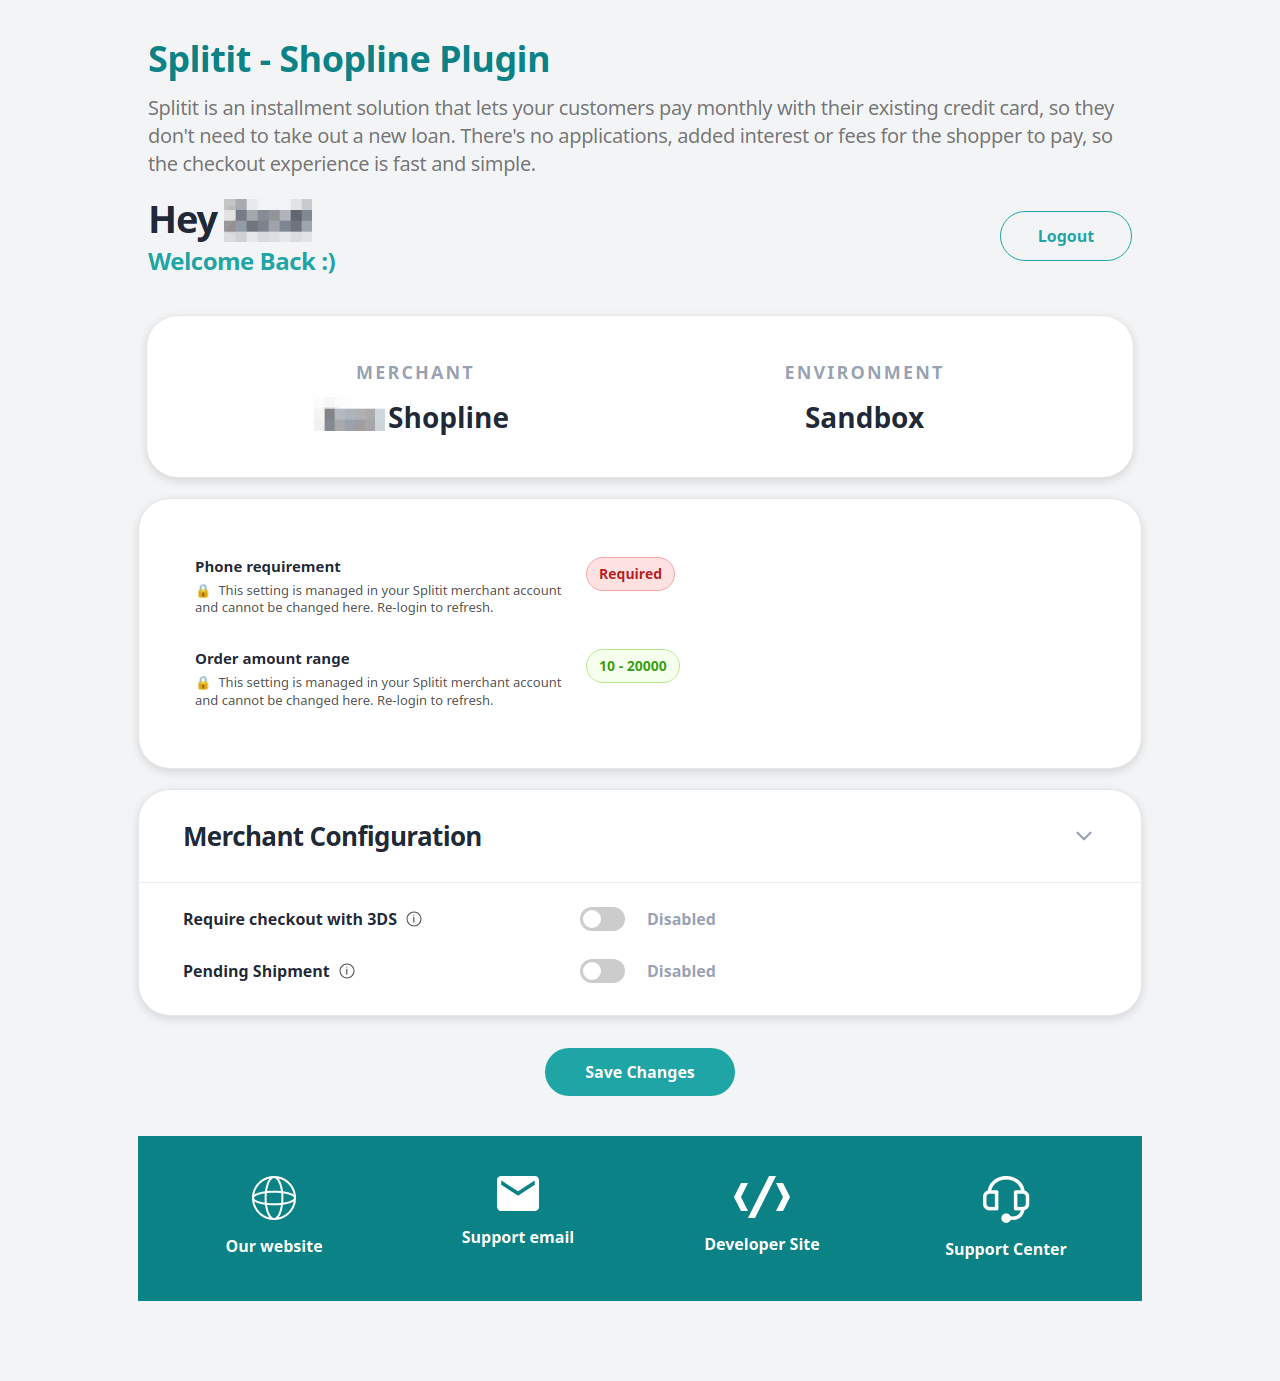
Phone requirement - Determines whether a customer phone number is required (i.e., Required). Important:
- This setting is visible here in the plugin's configuration but is managed in your Splitit account (note the lock icon); if it is changed at Splitit, make sure to refresh to view the updated values.
Order amount range - Sets the minimum–maximum cart total for which Splitit is shown (e.g., 10 - 2000). Important:
- Carts outside the configured range still display Splitit at checkout due to Shopline platform constraints. If a customer selects Splitit for an ineligible cart, they will see the message: "The system is currently busy. Please try again later or contact your payment channel for more details."
- This setting is visible here in the plugin's configuration but is managed in your Splitit account (note the lock icon); if it is changed at Splitit, make sure to refresh to view the updated values.
Require Checkout with 3DS: When enabled, shoppers must pass a 3D Secure verification step after entering card details.
Pending Shipment:
- Disabled: Installments start and charges are captured immediately at checkout.
- Enabled: The transaction is only authorized at checkout and captured later upon fulfillment. See Starting Installments below to charge an order upon shipment.
Admin Utilities
Viewing Orders
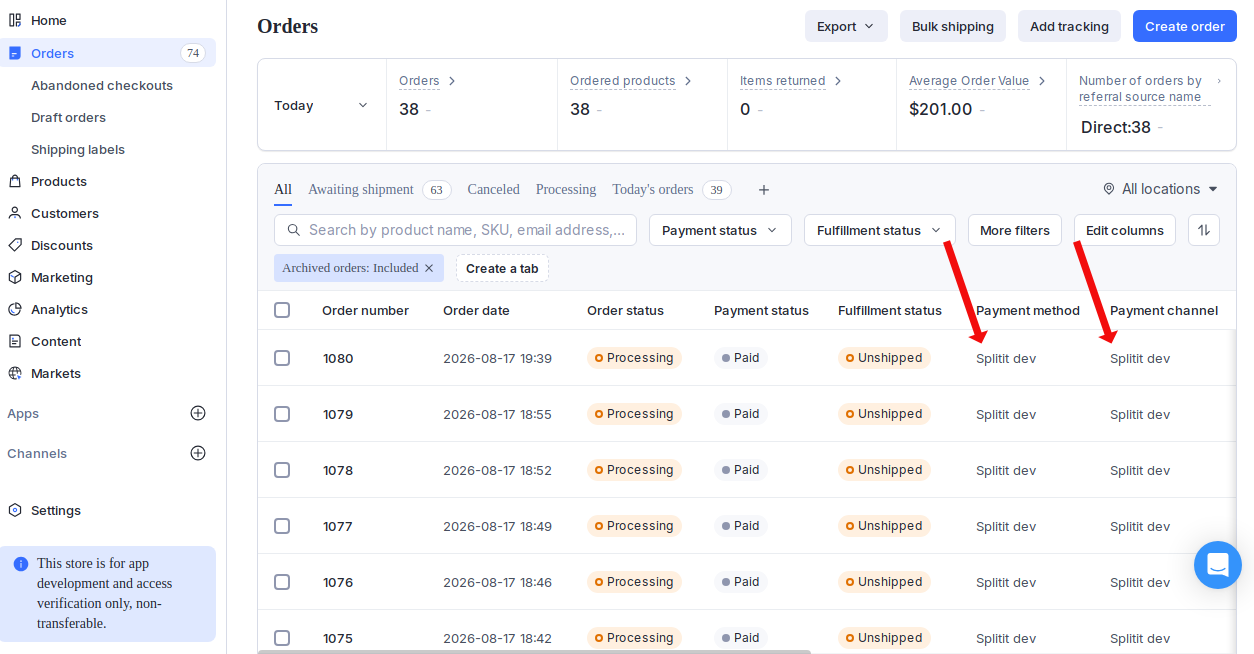
To view order information, go to Orders in the Shopline admin. Orders placed using Splitit will list Splitit as both the Payment method and Payment channel.
Matching an Order to Its Splitit Plan
- Shopline to Splitit:
- Find the Installment Plan Number in Shopline under Orders -> Select an Order -> Other details -> Splitit -> Installment Plan Number (in the right column):
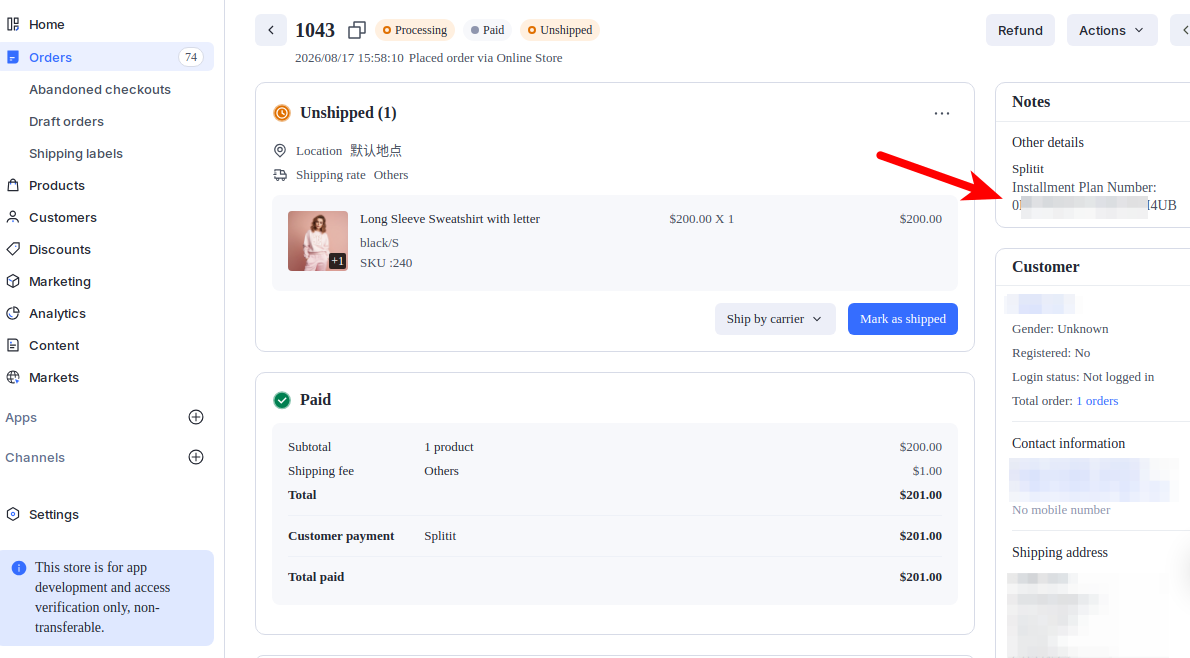
- Search for this Installment Plan Number in the Payment Plans tab in your Splitit Merchant Hub.

- Splitit to Shopline:
- Copy the Order Id from the Payment Plans tab in your Splitit Merchant Hub:
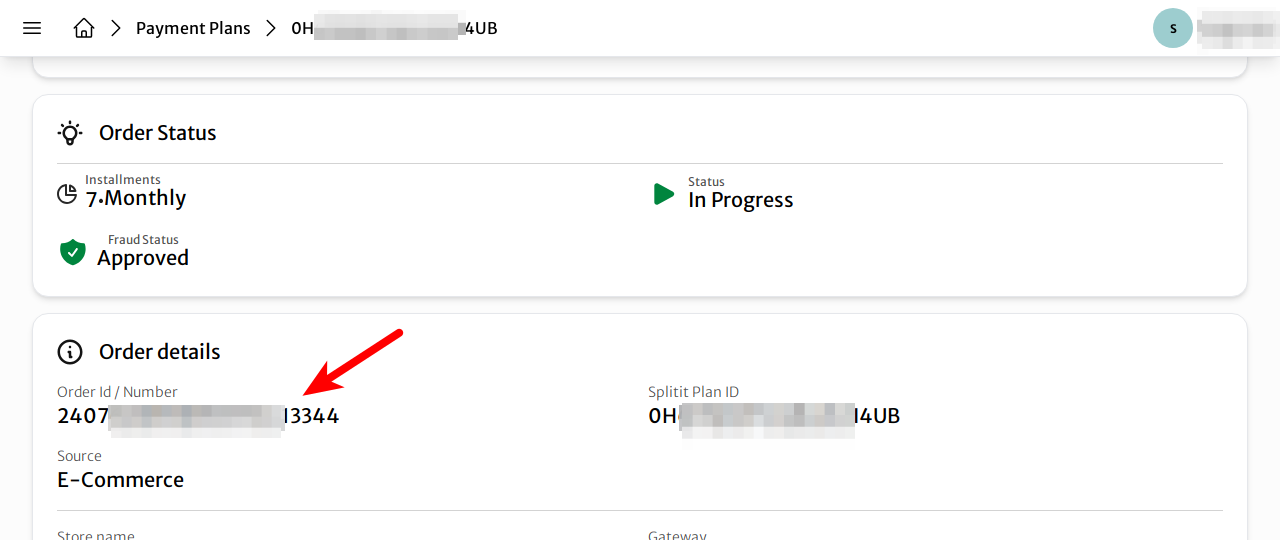
- Paste it directly into the Shopline Orders search bar.
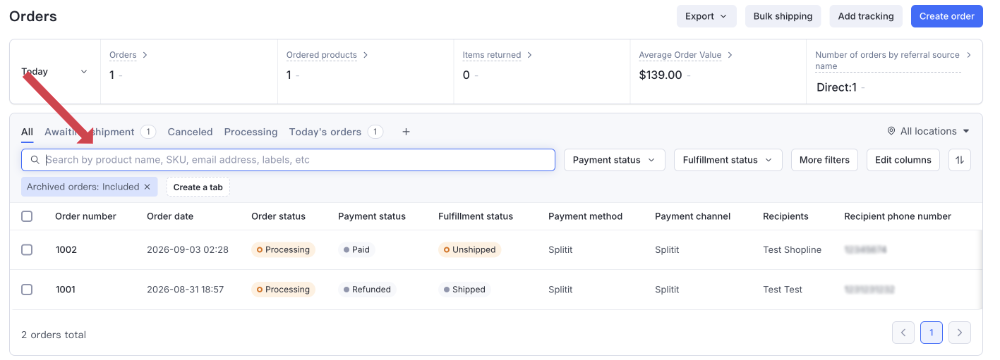
Cancelling Orders
To cancel an order, open the order by going to Orders -> Select Order, then navigate to Actions -> Cancel order at upper right:
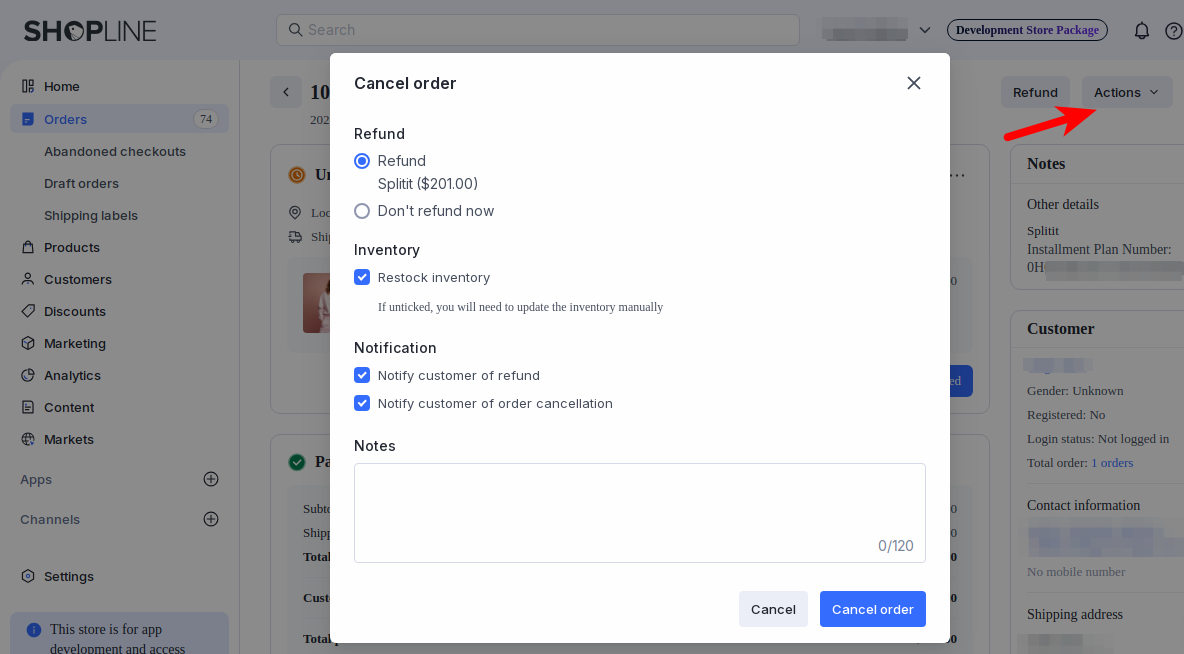
You have two options:
- Refund - Splitit (Default): This cancels the order, cancels the Splitit plan, and refunds the shopper.
- Don't Refund Now: Cancels the order without issuing a refund or releasing the authorization hold.
Don't Refund Now leaves the authorization outstanding. Shopline does not offer a Void option for Splitit orders, thus using Don't refund now leaves a credit hold standing. To release the hold, you must manually cancel the plan inside your Splitit Merchant Hub. Because of this, you should generally use the Refund - Splitit option unless you have a specific reason not to.
Refunding Orders
Shopline supports full and partial refunds. A full refund will refund the total order amount, close the order, and cancel the plan. A partial refund will refund the specified amount and keep the order and plan open.
To submit a refund:
- Open the order by going to Orders -> Select Your Desired Order, then navigate to the Refund button at upper right on the order's page.
- Select products and specify item quantities to define the refund amount, or enter an amount manually.
- Click Refund.
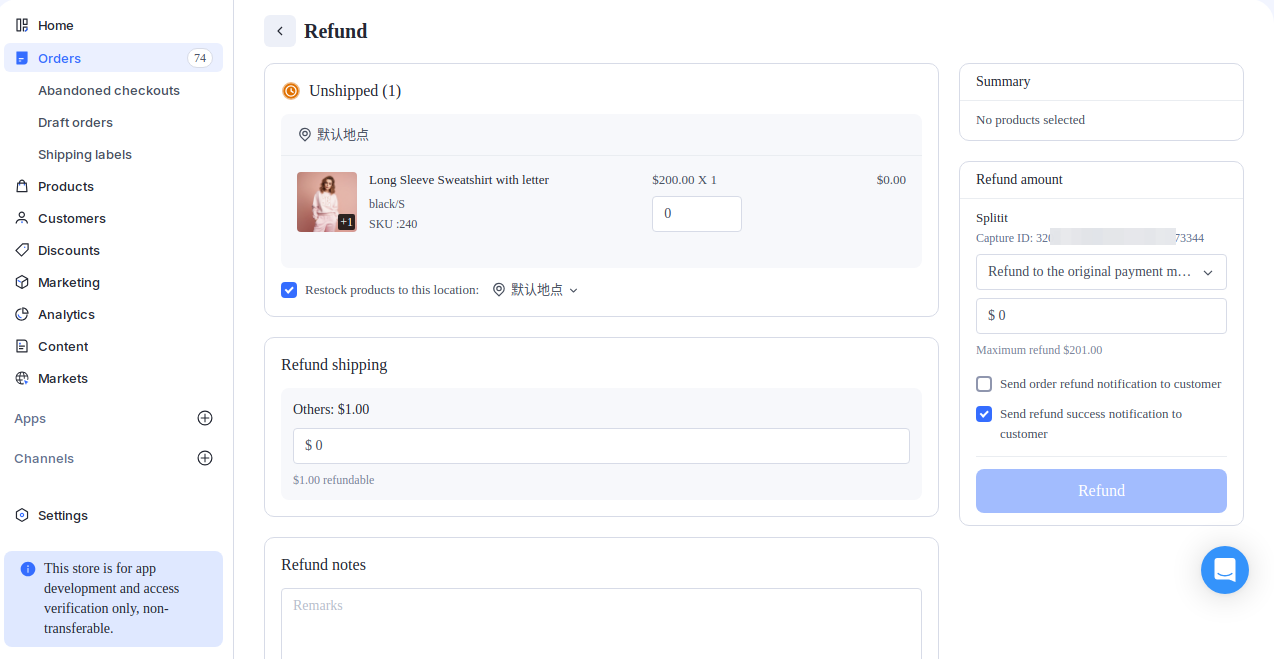
Refunds are processed asynchronously. The order’s payment status moves to Partially refunded or Refunded once Splitit confirms the refund.
Starting Installments (Pending Shipment)
When Pending Shipment is enabled in your merchant configuration, Splitit plans are authorized at shopper checkout, but the first installment is not charged and the plan is not started until the order is actually fulfilled.
To start a plan and charge its first installment, do the following:
- Open the order by going to Orders -> Select Your Desired Order, then navigate to the Marked as shipped button at lower right on the order's page.
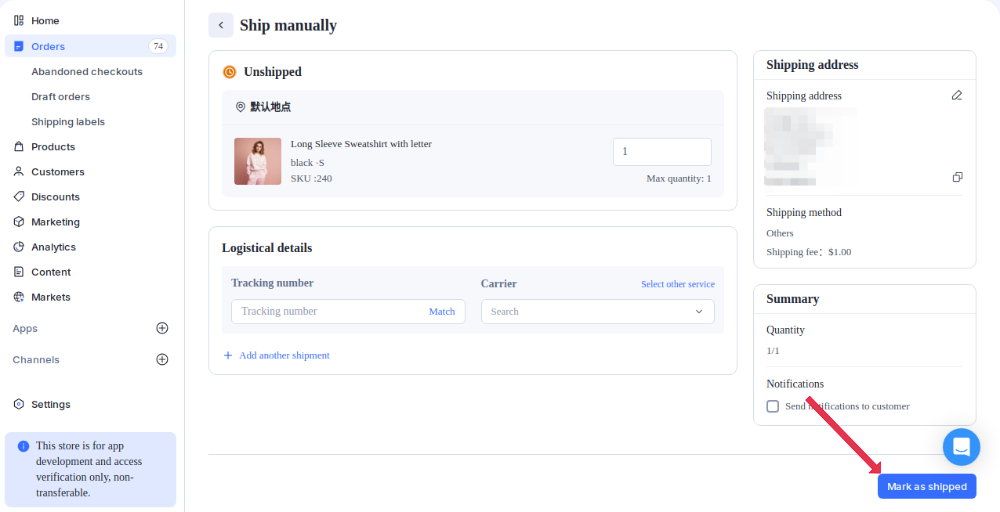
- Enter your tracking number, then click Match and select an official carrier from the list (a carrier is required). If you are using an unlisted carrier, select Other and fill in both the carrier's name and tracking URL.
- Once your order has been fulfilled with valid carrier data, its plan status will update to In Progress in the Splitit Merchant Hub within c. 30 seconds, initiating the first installment collection.
Starting installments without usable carrier data will leave the plan in Pending Shipment status.
Understanding Checkout Flow
If the plugin is activated, Splitit will appear at checkout with the byline "Monthly credit card payments - no fees".
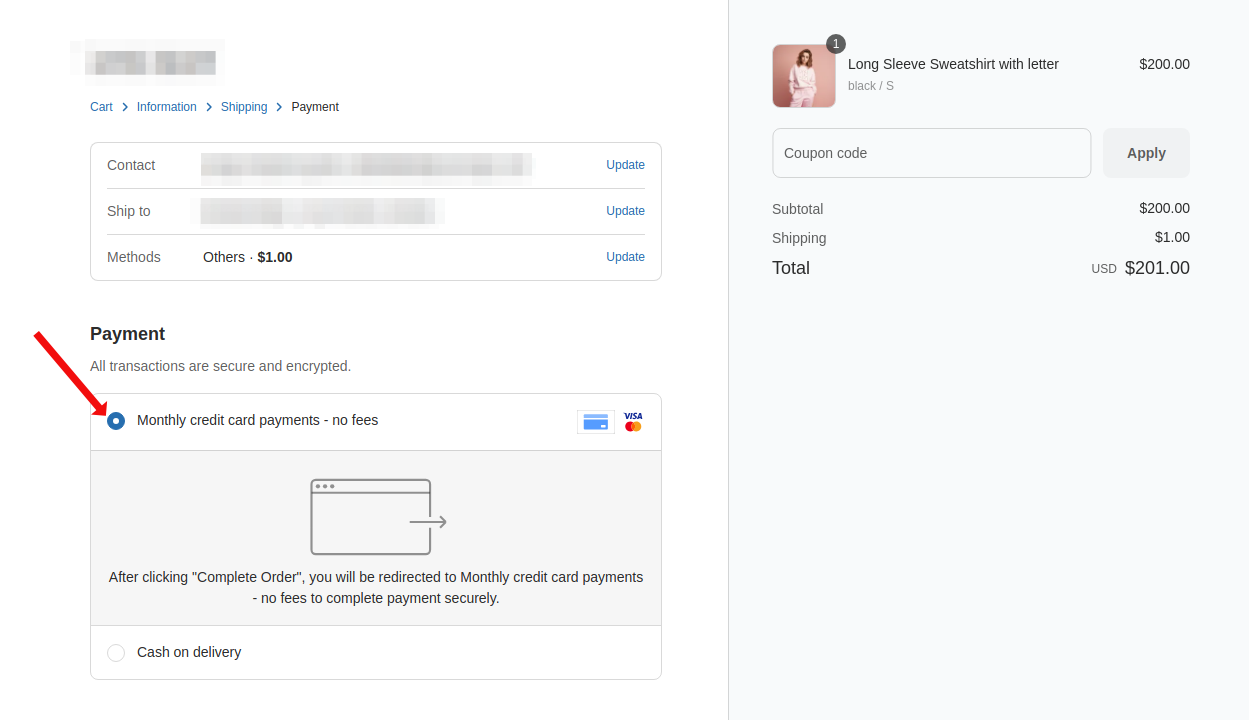
If the shopper selects it as a payment method and clicks Complete Order, they will be redirected to a Splitit-hosted page.
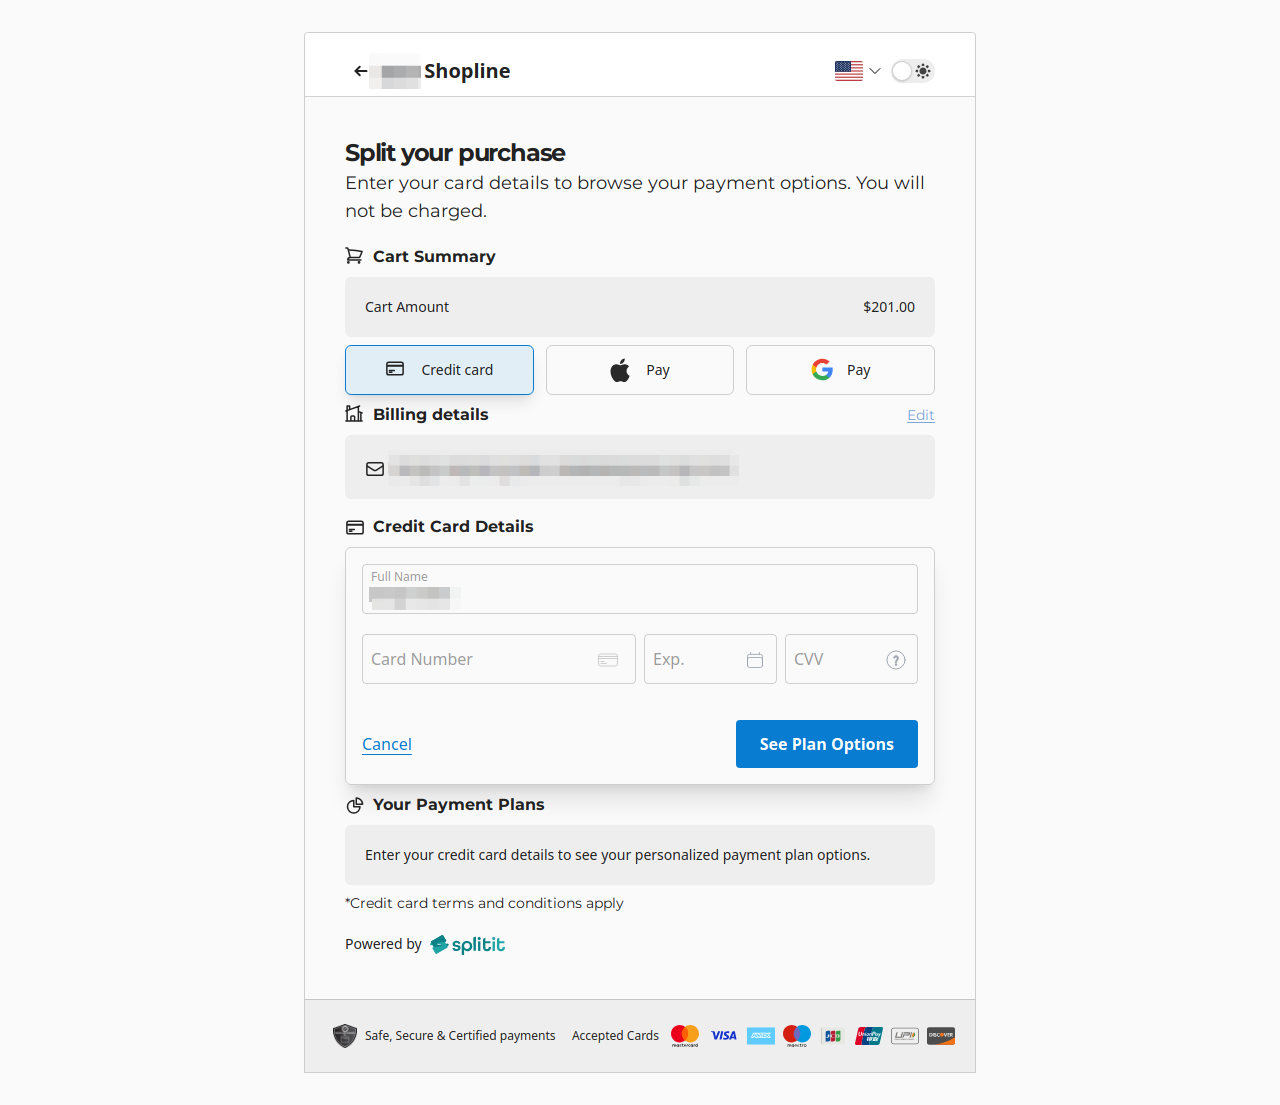
After entering their card, clicking See Plan Options displays the installment plans available to them (based on the plans configured in your Splitit account):
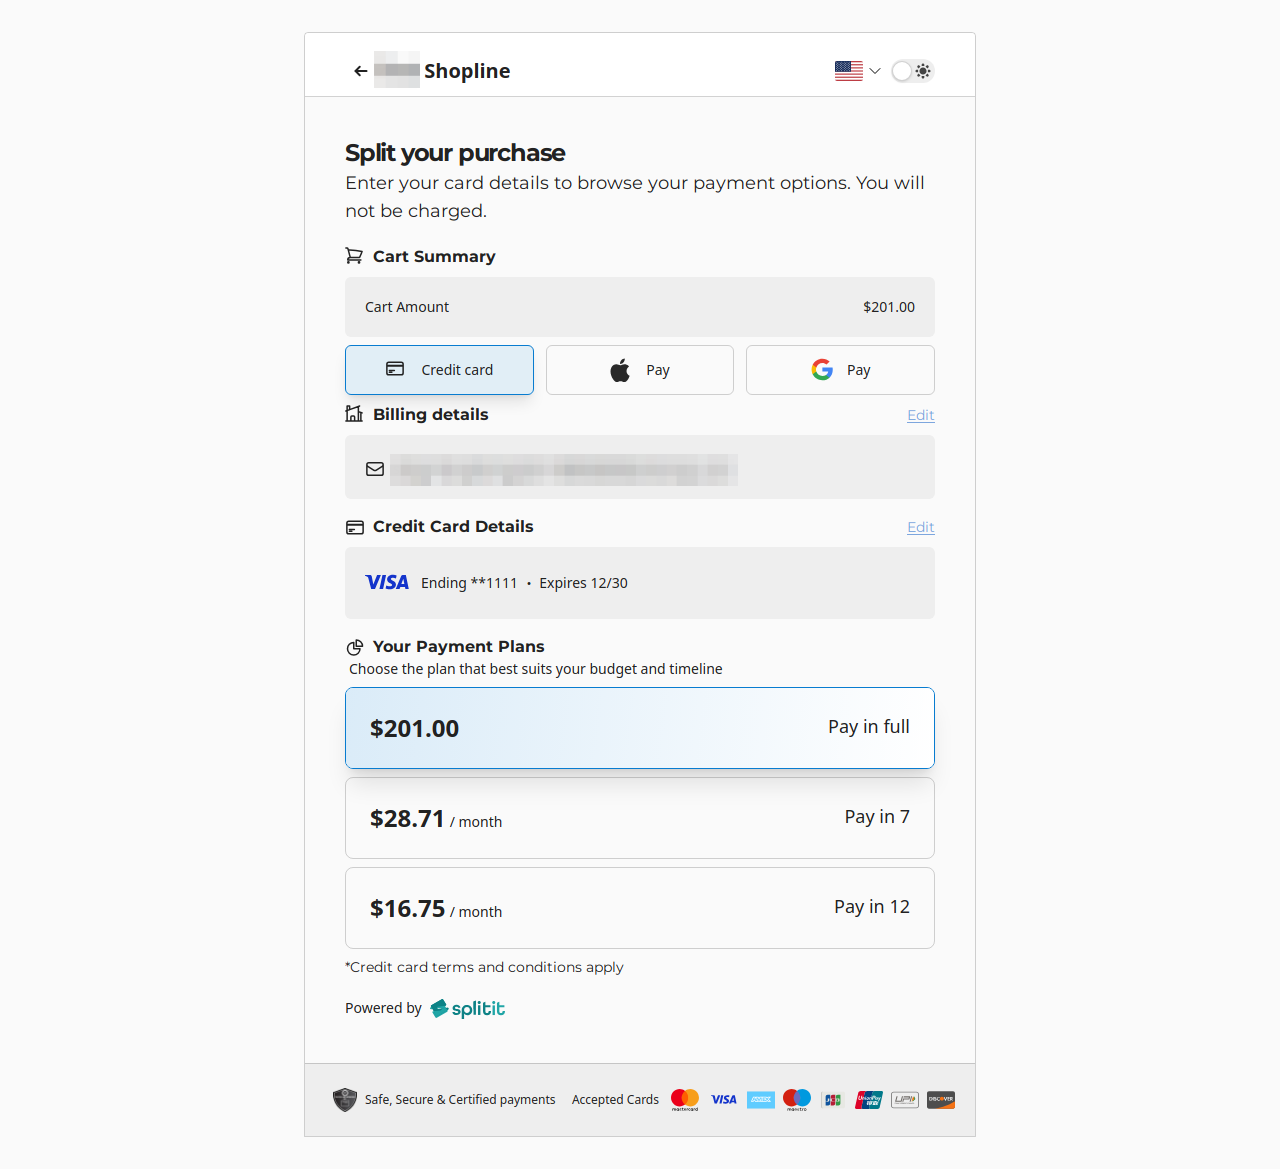
The shopper selects a plan, accepts the Terms & Conditions, and clicks a payment button with the amount (e.g., "Pay $28.71 / month").
If 3D Secure is not enabled in your configuration, and the transaction is successful, the shopper will be returned to an order confirmation page in your store.
If 3D Secure is enabled, a verification step will appear after the order is submitted, and the shopper will be returned to the confirmation page once verification succeeds.
Conversely, the shopper will see an error message if a transaction is unsuccessful.