Shopline On-Site Messaging App
The Shopline On-Site Messaging App lets you display Splitit installment breakdown images throughout your site, notifying shoppers early on during their site sessions that installment payments will be an option at checkout.
Installation and Configuration
-
In the SHOPLINE admin, go to Apps -> Go to App Store, search for "Splitit On-Site Messaging", and click Install. Approve the permissions SHOPLINE asks for.
-
Activate the app in your theme by going to Online Store -> [Your Desired Theme] -> Design then App Embeds --> Splitit On-Site Messaging. Turn the switch on then click Save. (Note that you'll need to repeat this step for each theme if you have multiple themes, or also if you switch back to a previous theme.)
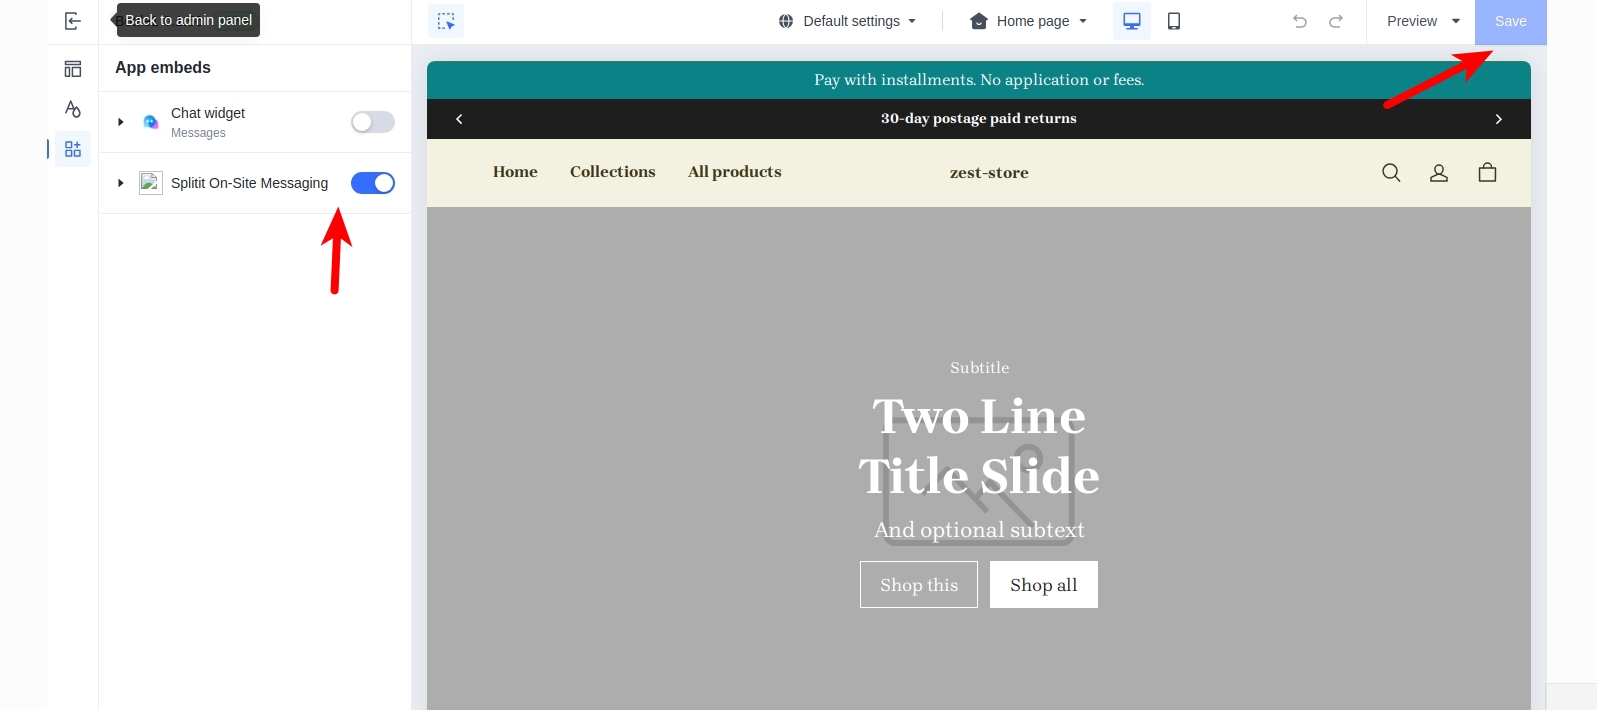
- Return to the Shopline admin's home screen, then click Apps -> My Apps. Click on Splitit On-Site Messaging.

- Enable the app using the switch at the top of the page: "Enable/Disable Splitit On-Site Messaging plugin."
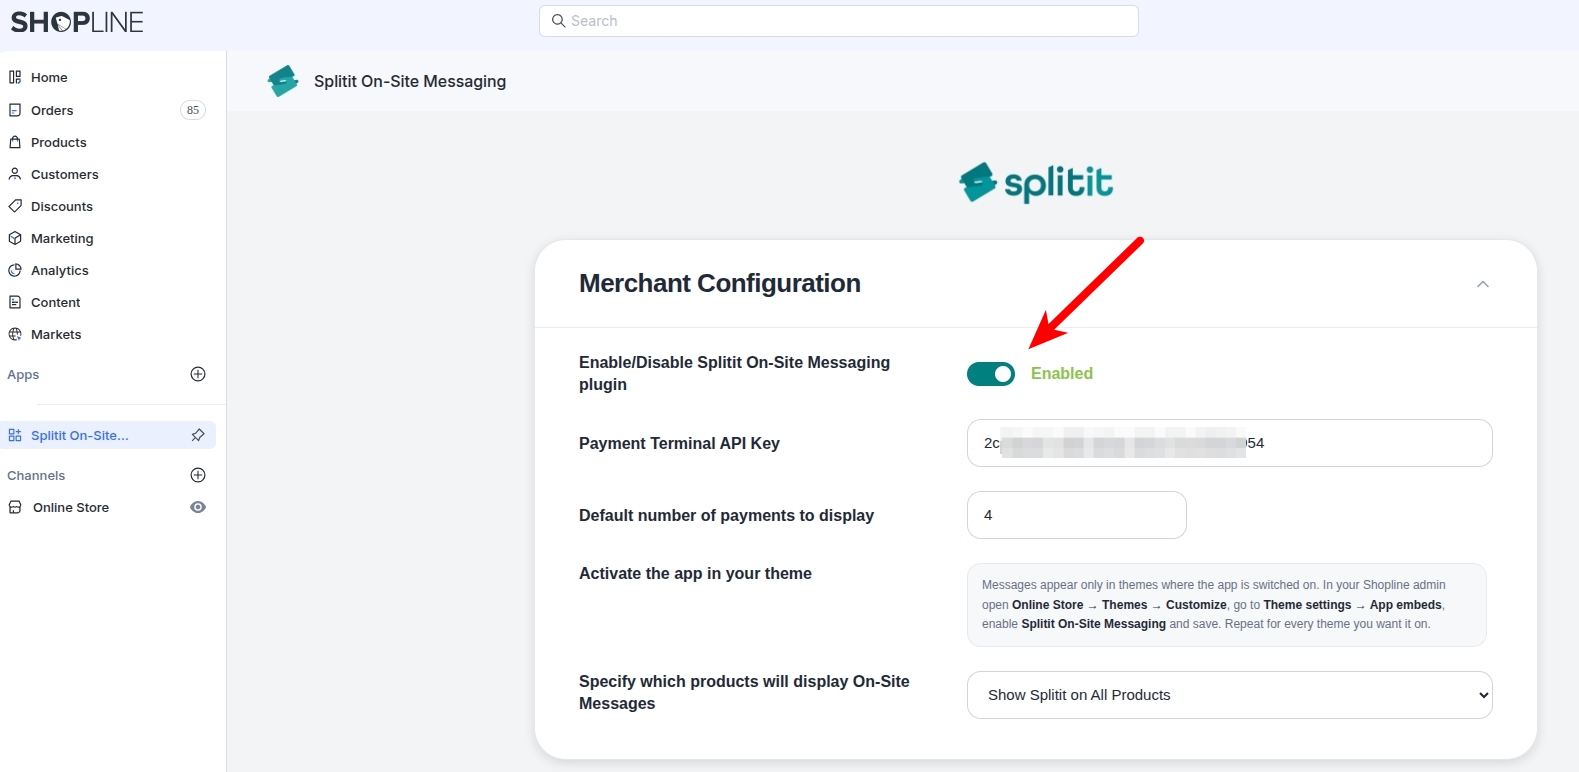
- Find your Splitit Payment Terminal API Key, which you can get from your Merchant Hub (see the dropdown below if you need help finding your API key). Enter it in the field Payment Terminal API Key.
Finding Your API Key on Your Merchant Hub
In your Hub, go to Merchants Management on the left-hand side. Click on your merchant name, then view your API Key under Merchant Details.
-
In the next box, enter the default number of payments by which you'd like to divide a product's price.
-
Finally, at the bottom define which products will show Splitit messaging on your website:
- "Show Splitit on All Products" is recommended and the default
- "Show Splitit per product's minimum amount" lets you set a minimum product price for On-Site Messaging. If you select this, enter a minimum product amount.
On-Site Messaging Configuration
After you have installed the app and finished with the configuration above, proceed to the On-Site Messaging settings section.
There are two types of On-Site Messages, Strips and One Liners, and they are configured separately for your Home Page, Catalog Page, Product Page, and Cart Page. You can only set one type of message per page. (Note that the Home Page offers Strips only.)
To set On-Site Messages for a page type, open a page card, choose either Strip or One Liner using the Display Component tab, turn on its Enabled toggle, configure it, Preview it, then Save Changes at the bottom of the screen.
Warning: Switching the Display Component resets the other type's settings
A page saves only the settings of the component that is currently enabled. If you switch a page from the One Liner to a Strip and back, the One Liner's settings are not kept. Its CSS Selector fields and styling options come back empty or at their defaults, and saving in that state makes the blanks permanent.
When you switch a page back to a One Liner:
- Re-enter the CSS Selector (and the second selector, if you use one)
- Check the styling options: Text Size, Font Weight, Payment Frequency, Text Option and Color
- Save, then reload the settings page and confirm the values are still there
- Open the storefront page and confirm the message is back
Write your selectors down before you experiment with the switch. If you flip back and forth without leaving the page, the values may appear to survive. That is only the browser still holding the form, and a reload clears them.
Strips
Strips are full-width notification bars across the top or bottom of a page (for example “Pay with installments. No application or fees.”):
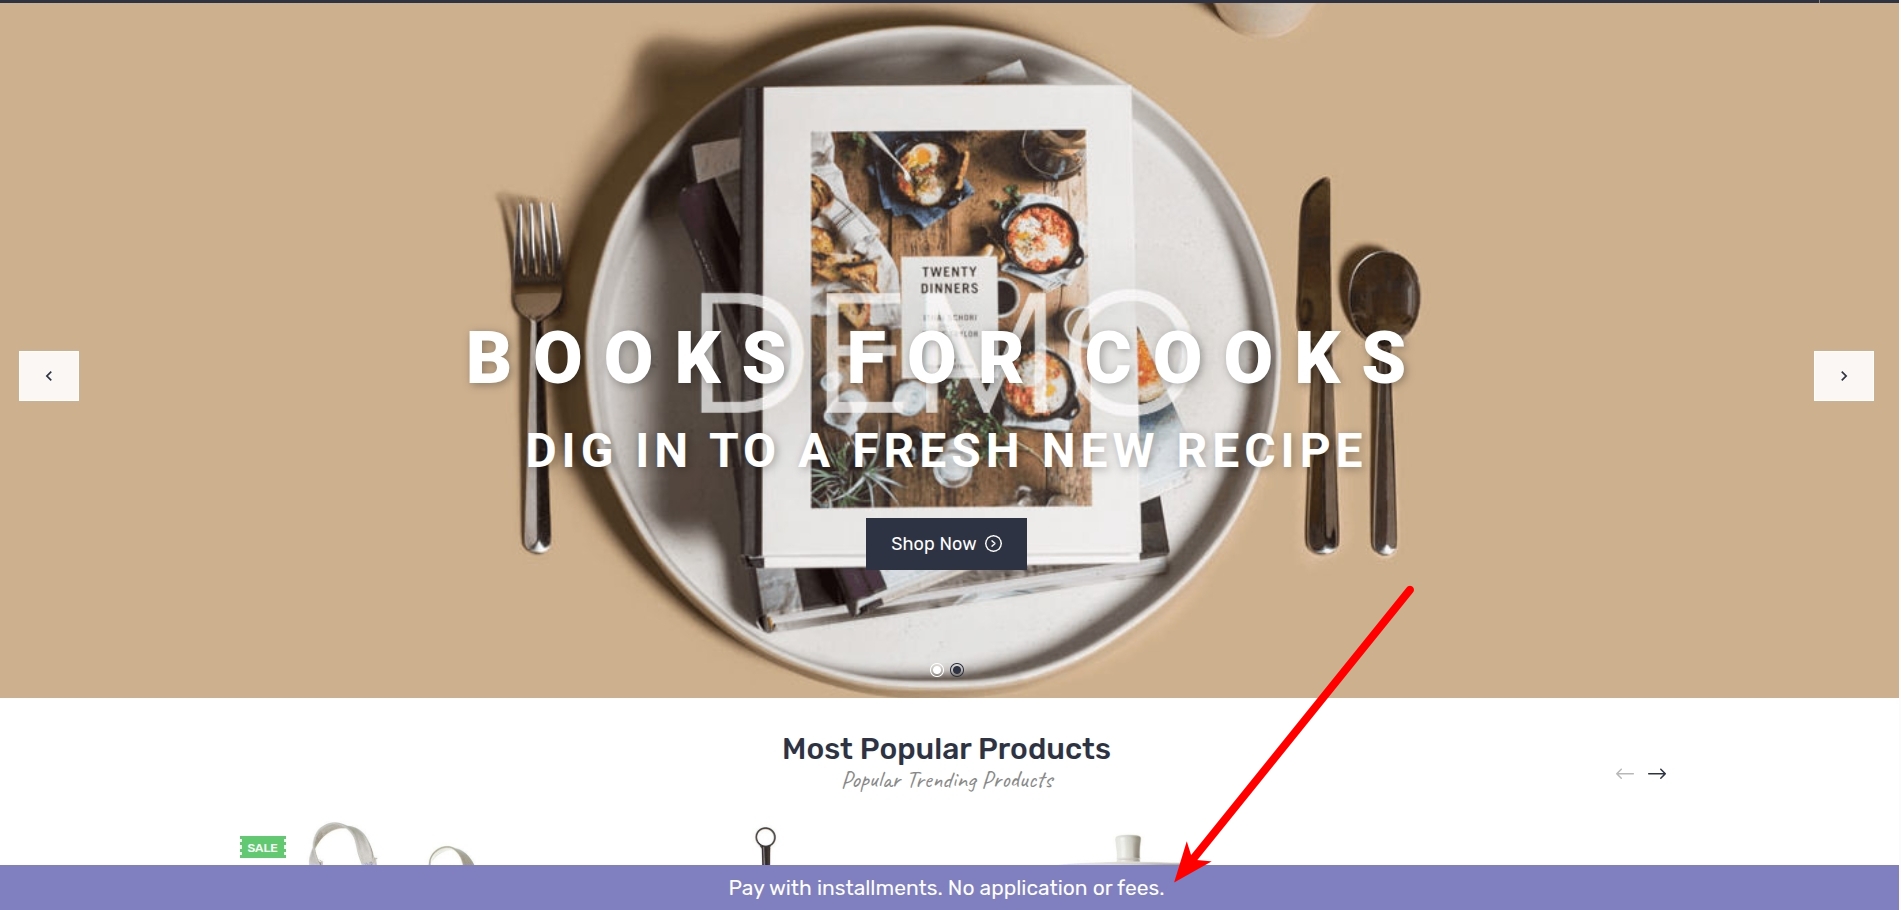
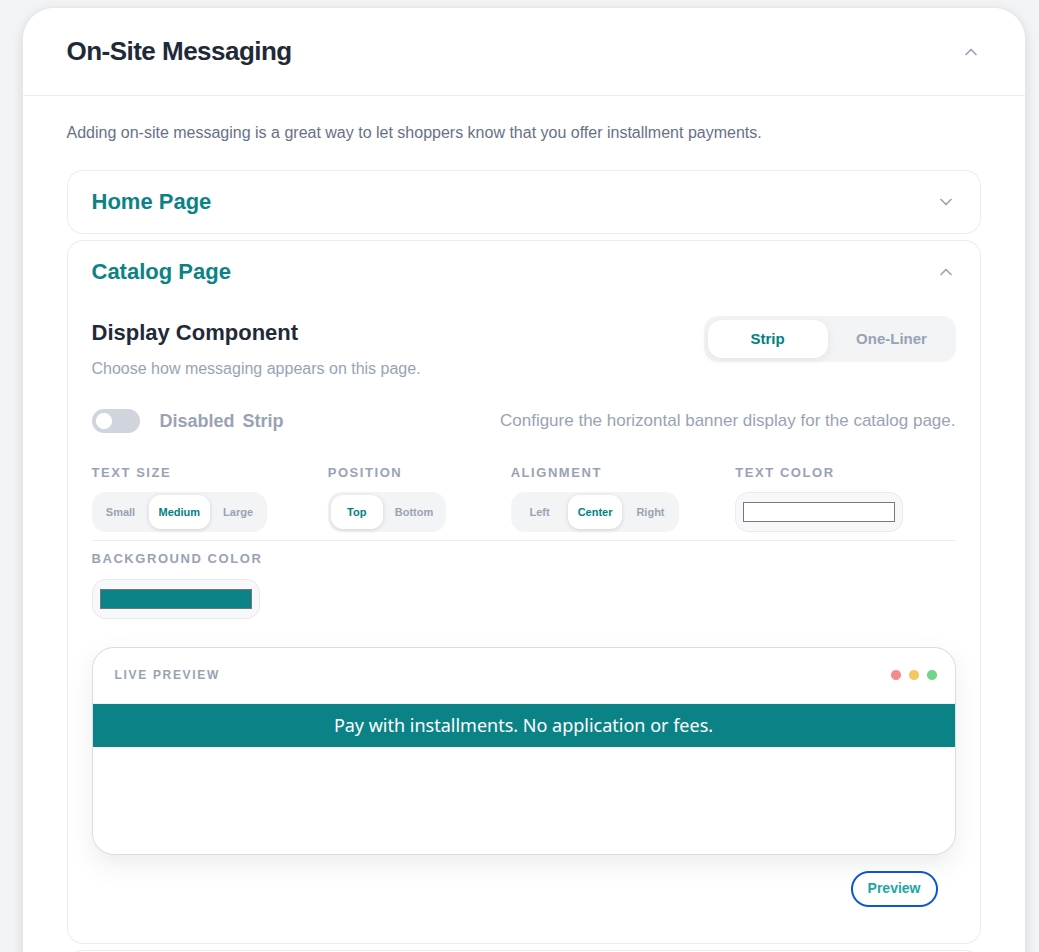
Configure Strips using the following settings:
Enabled - Toggles Strip on or off
Text Size - Sets small, medium or large text
Position - Sets top or bottom positioning
Alignment - Sets left/center/right alignment
Text Color - Specifies the color of the main text; it can be selected by colorpicking or by entering RGB, HSL, or HEX values. To switch from RGB to any other mode, click on the letters "RGB"
Background Color - Sets the background color of the strip; it can be selected by colorpicking or by entering RGB, HSL, or HEX values. To switch from RGB to any other mode, click on the letters "RGB"
The Preview button applies the changes to the message example that can be seen on this configuration page.
One Liners
One Liners are compact, inline, "pay in X installments" message shown next to a price:
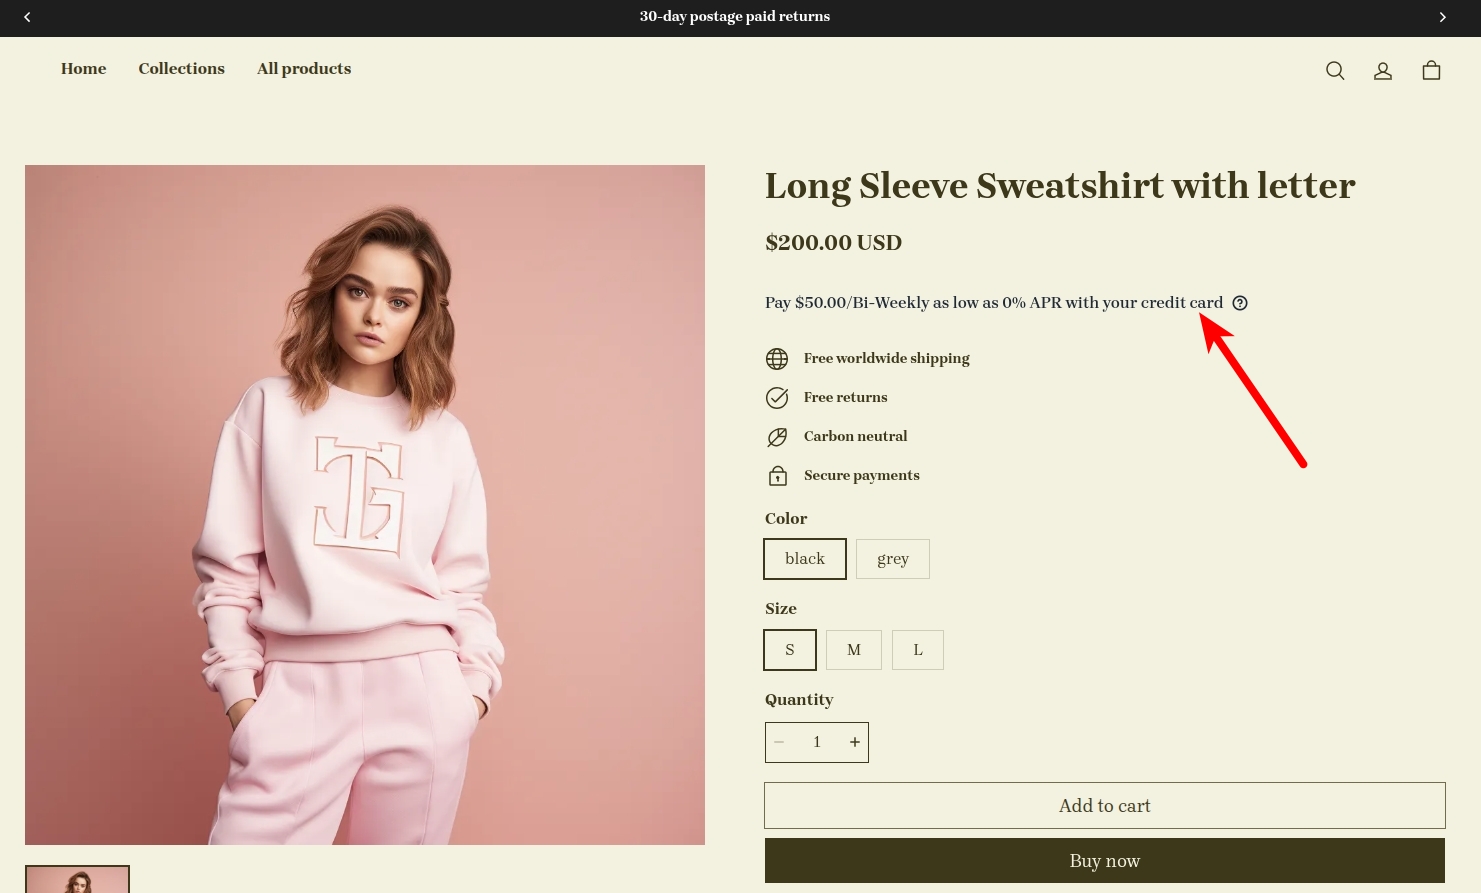
Configure One Liners using the following settings:
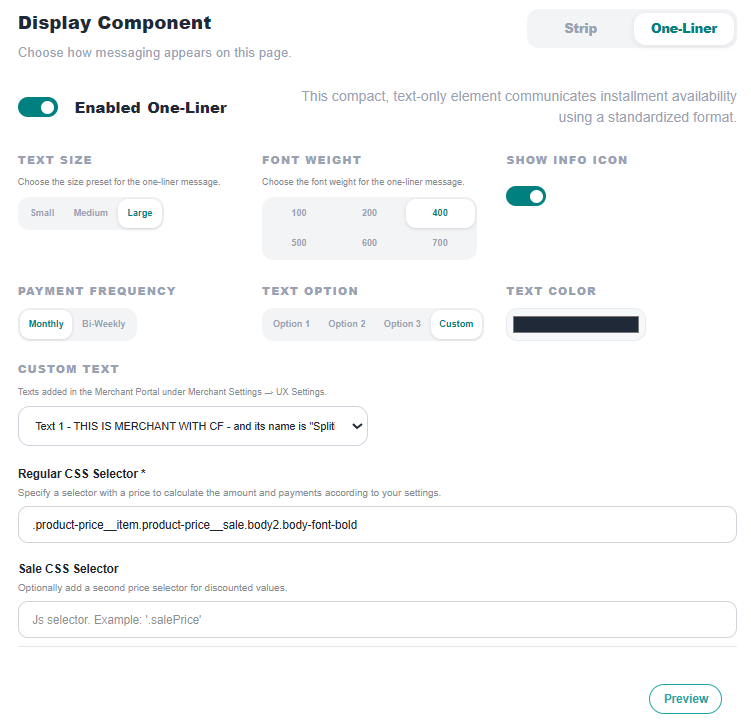
Enabled - Toggles the One Liner on or off
Text Size - Specify small, medium or large text
Font Weight - Lets you use one of six presets (100, 200, 400, 500, 600, 700), to better match your message to your theme
Show Info Icon - Shows/hides the "?" tooltip icon, which opens a panel explaining how Splitit works
Payment Frequency - Display calculations for monthly/bi-weekly payment options
Text Option - Enables you to choose a text for the One Liner (three built-in options are available), or use a Custom text, which you choose in the line below (these are set in your Merchant Hub, under Merchants Management -> Select Your Merchant -> Customize plan design -> On-site messaging).
Text Color - Sets the color of the main text. It can be selected by colorpicking or by entering RGB, HSL or HEX values. To switch from RGB to any other mode, click on the letters "RGB"
Primary CSS Selector/Additional CSS Selector - Price source/placement anchors. See "Choosing CSS Selectors for One Liners" below
The Preview button applies the changes to the message example that can be seen on this configuration page.
Choosing CSS Selectors for One Liners
One Liners are attached to pages using CSS selectors. The label and meaning differ by page:
Product and Cart pages: "Primary CSS Selector" (required) / "Additional CSS Selector" (optional). The primary selector is the anchor where the message is displayed; the additional selector is a fallback used if the primary element is missing.
Catalog page: "Regular CSS Selector" (required) / "Sale CSS Selector" (optional). The selector must point to an element that contains the price, which the app reads to calculate the installment amount. Use a regularly priced element for normal prices and a discounted price element for sale prices.
Tips for Finding Selectors
You can use your web browser's built-in developer tools to find the selector for the element you want to add your message to. Here's how to do it:
- Right-click on the element you want to select
- Click "Inspect" or "Inspect Element"
- The developer tools will open with the selected element's HTML code highlighted. Look at the highlighted code for the element's tag name, class, or ID. Use the corresponding CSS selector syntax to select the element: for example, if the element has a class of
my-class, use the selector.my-class - Once you have the selector for the element, you must enter it into your On-Site messaging settings for the respective One Liner
Remember that One Liners use the price information to calculate payment offers. So for them you must pick the selector that contains the product price.
If a One Liner does not appear on your storefront, an empty or incorrect CSS selector is the most common cause
On-Site Messaging CSS
The Custom CSS block lets you add your own CSS code to modify the style of your On-Site Messages. Target the widget elements themselves, spt-strip and spt-one-liner, or your own wrapper classes.
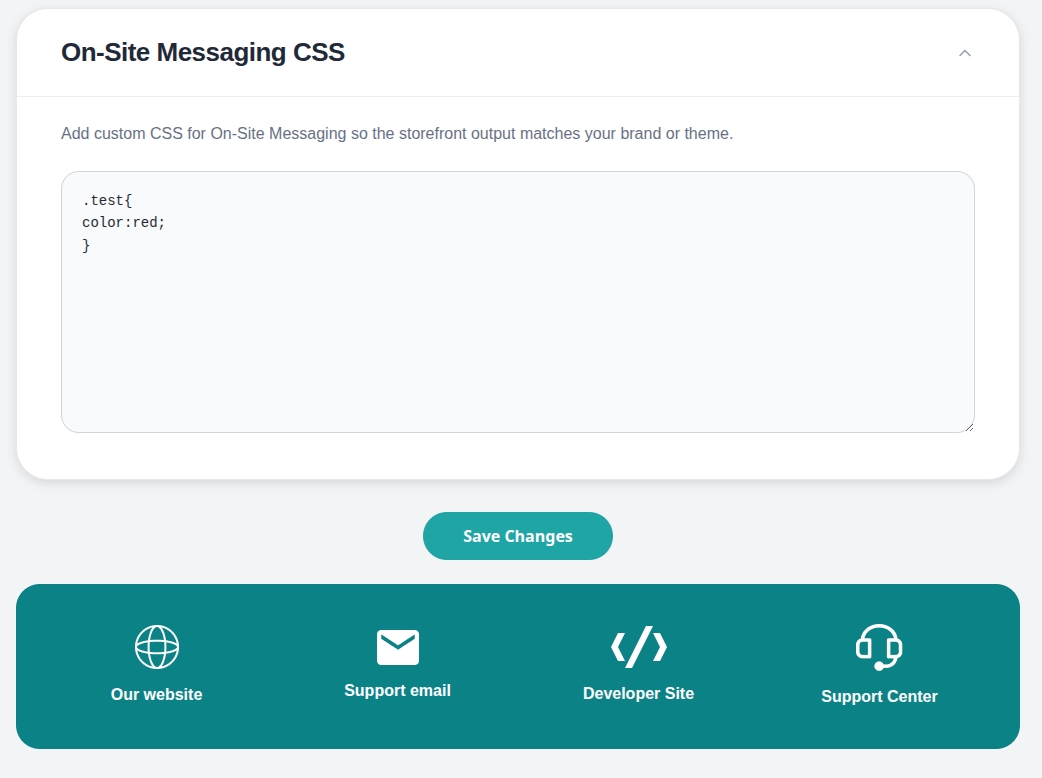
Make sure to click Save Changes once you are finished on this page.
Testing
- Configure and save your settings.
- Use each section's Preview button to explore the look of a widget without going to your actual storefront. This renders the component with your current values but saves nothing.
- Open your actual storefront page and reload it. Note that changes saved in the config will reach the storefront within a few seconds, but not instantly.
- Check each page individually that you enabled: Home Page, Catalog Page, Product Page, and Cart.
If you need to rehearse a change without shoppers seeing it, do it on a development store rather than on a preview of your live theme.
Troubleshooting
No messages appear anywhere on the storefront:
Check, in this order:
- the master on/off switch in your configuration
- the app embeds toggle in your published theme
- whether you recently published or switched a theme (the most common cause)
Messages appear on some pages but not others:
Each page has its own Enabled toggle, and the Display Component tabs specify which widget type is active there. Check the card for the page in question.
A One Liner does not appear, but a Strip does:
Strips are positioned using the overall page, but One Liners need CSS selectors that allow them to attach to elements on the page. Open the page, inspect the price, and confirm the selector still matches what you used (note that theme updates sometimes rename classes).
The message shows the wrong amount:
The selector is pointing at the wrong element, most often a crossed-out "was" price, or a container that holds more than the price.
Messages appear on cheap products where installments are not available.
Set Specify which products will display On-Site Messages to the minimum amount option and enter the same minimum that your Splitit account has.
A change on the settings page has not reached the storefront.
Reload the storefront page once after saving, before concluding that a setting has had no effect.